Correcting Chromatic Aberration
Chromatic aberration is a lens artifact that can result in fringes in high contrast areas of some photos. The camera lens can cause different wavelengths of light to focus differently, which appears in photos as colored fringing or colored lines on the borders of high contrast areas. Purple fringing can also occur when there is a bright spot of light in front of the lens.
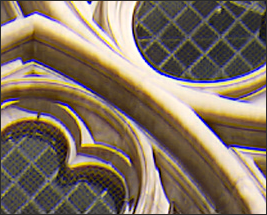
This zoomed-in image shows an example of blue/yellow fringing.
You can use the Chromatic Aberration tool in Edit mode to reduce the appearance of colored fringes. This can be especially useful for photos with architectural details. For best results, it's recommended that you use the Chromatic Aberration sliders first, and then the Defringe sliders.
To Reduce Fringing in Your Image:
- In Edit mode, in the Detail group, select Chromatic Aberration.
- Adjust the sliders as described below.
- Do one of the following:
- Click Done to accept your changes and close the panel.
- Click Cancel to discard your changes and close the panel.
You can also access the Chromatic Aberration tool from the Filter drop-down menu or Filter toolbar.
You can right-click a slider to reset to the default value.
Chromatic Aberration Options
|
Fix Red/Cyan |
Adjust the red and cyan channels to reduce red/cyan fringing. |
|
Fix Blue/Yellow |
Adjust the blue and yellow channels to reduce blue/yellow fringing. |
|
Defringe strength |
Adjust the amount of fringe color you want to remove from high contrast edges. A setting of zero means that defringing is off. |
|
Defringe radius |
Adjust the number of pixels surrounding an edge that will be defringed. |
|
Color |
Adjust the color to remove from high contrast edges. |
You can use the Edit Brush  to paint this effect onto specific areas of your image.
You can use the Gradient tool  to transition this effect across specific areas of your image.
You can use the Radial Gradient tool  to apply effects around, or directly to, a center point.