Adjusting Color with Color EQ
You can use the Color EQ tool in Edit mode to adjust overall colors in an image or each color individually. The advanced tools can subtly fine-tune and enhance colors, or completely change individual colors in an image.
Color EQ is useful for changing a single color in an image. If you have an image with a yellow car, you can use the Saturation tab to saturate the yellow or use the Brightness tab to brighten the yellow. In the Hue tab, you can change the color of the car from yellow to pink. In the Contrast tab, you can adjust the contrast of the yellow and use the Balance slider to target the brightness range for that contrast adjustment.
You can then use the Global Adjustments to make changes to balance the colors in your image. Vibrance adjusts the vibrancy of colors, saturation affects the strength of colors, color shift adjusts the hue without affecting brightness, hue will change colors, and lightness will affect how light the whole image is. You can also adjust color using the Red, Green, and Blue sliders to increase or decrease the balance of those colors.
You can save your settings as a preset for future use.
If you have an image of a yellow car with a yellow building in the background, you can change just the car by using the Selections tool. Select the car using the Selections tool and then apply your color adjustments.
To Adjust Color:
- In Edit mode, in the Color group, select Color EQ.
- Select any of the tabs within the ColorEQ or any of the sliders in the Global Adjustments section, and adjust them according to the options described in the tables below.
- Do one of the following:
- Click Apply to apply your changes.
- Click Done to apply your changes and close the tool.
- Click Cancel to discard all changes and close the tool.
You can also access the Color EQ tool from the Filter drop-down menu or Filter toolbar.
You can use the Edit Brush  to paint this effect onto specific areas of your image.
You can use the Gradient tool  to transition this effect across specific areas of your image.
You can use the Radial Gradient tool  to apply effects around, or directly to, a center point.
At the top of the Color EQ pane, choose either High Quality or Standard. Adjust image colors individually. High Quality uses the newer, more modern color models, allowing for a visually perceptive and higher quality adjustment. Standard supports previously developed images and allows you to adjust colors individually or make global adjustments.
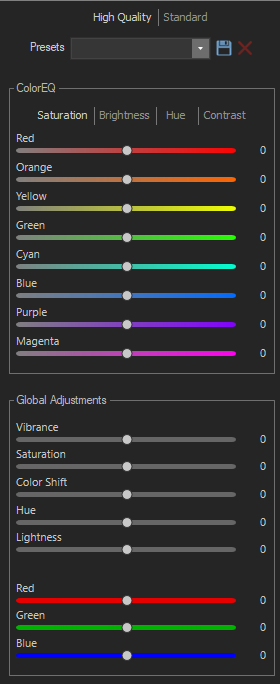
Color EQ Options - High Quality.
|
|
Presets |
In the presets drop-down menu, you can choose from existing presets, or save any of your current edits as a preset, using the save icon. |
|
|
Color EQ |
Saturation, Brightness and Hue sliders |
Adjust each color individually by dragging sliders right for more intensity, or left for less intensity. You can also enter a number into the fields for precise adjustments. You can also select a precise color to adjust by placing your cursor on the image for the double arrow icon to appear. Then click and drag up or down to adjust the colors beneath the double arrow icon. The affected color sliders automatically adjust as you move your cursor. The sliders have the following effects:
|
|
|
|
Contrast sliders |
Adjust each color individually by dragging sliders right for more intensity, or left for less intensity. You can also enter a number into the fields for precise adjustments. You can also select a precise color to adjust by placing your cursor on the image for the double arrow icon to appear. Then click and drag up or down to adjust the colors beneath the double arrow icon. The affected color sliders automatically adjust as you move your cursor. On the Contrast tab, once you have adjusted contrast, you can adjust contrast balance, which changes whether you apply the contrast to the lighter or darker colors in the image. |
|
|
Global Adjustments |
Vibrance, Saturation, Color Shift, Hue, and Lightness Sliders |
Drag the sliders to make global adjustments. They will have the following effects:
|
|
|
|
Red, Green, and Blue sliders |
Drag the sliders to make global adjustments to the red, green, and blue channels in your image. |
|
Color EQ Options - Standard.
|
|
Presets |
In the presets drop-down menu, you can choose from existing presets, or save any of your current edits as a preset, using the save icon. |
|
Vibrance |
Drag the slider to adjust the vibrance of the image without affecting skin tones. |
|
|
Vertical slider |
The vertical slider applies adjustments to the entire image. It has the following effects on the tabs:
You can also enter a number into the field for precise adjustments. |
|
|
Direct image adjustments |
Place your cursor on the image for the double arrow icon to appear. Then click and drag up or down to adjust the colors beneath the double arrow icon. The curve control and the affected color sliders automatically adjust as you move your cursor. The black down arrow on the graph indicates the color you are adjusting in the image. The curve appears black in the graph, and you cannot directly adjust it. To apply further adjustments, you can alter the white curve. When you adjust the white curve, the black curve automatically changes with it. You can also enter a number into the fields for precise adjustments. |
|
|
Individual color sliders |
Adjust each color with individual sliders. Select the color you want to adjust and click and drag the sliders. You can also enter a number into the fields for precise adjustments. |
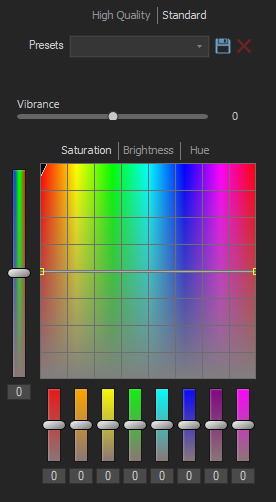
You can right-click a slider to reset to the default value.