Using ACDSee AI Super-Resolution in Manage Mode
AI Super-Resolution enhances the quality of your images by using advanced algorithms to intelligently upscale lower-resolution photos. This feature increases the resolution and detail of your images, making them sharper and more defined without compromising quality. Whether you're enlarging a small photo or improving the clarity of a digital image, AI Super-Resolution helps you achieve professional results with ease.
How AI Super-Resolution Works:
AI Super-Resolution enhances image quality by analyzing patterns, textures, and colors in the image. It then applies a complex algorithm to upscale the image, reducing noise and blurriness, removing artifacts, and adding pixels where necessary to maintain clarity and detail. This feature is especially useful for enlarging small images or zooming into cropped photos.
Examples of when to use AI Super-Resolution:
- Enlarging low-resolution images for large prints or displays
- Enhancing cropped images to improve their quality
- Increasing the size of older photos taken with lower-resolution cameras
How to apply AI Super-Resolution
To enhance your images with AI Super-Resolution, perform the following:
- Find the image you want to enhance in Manage mode and do one of the following:
- Select AI | AI Super-Resolution... from the top menu bar.
- Right-click the image and select AI Features | AI Super-Resolution...
- Press Option + Shift + S.
- In the AI Super-Resolution dialog, choose your preferred settings. The preview will automatically generate a new preview whenever parameters are changed so you can always see what it looks like in real-time.
- Click Enhance to apply Super Resolution to your image. The enhanced image will be saved by default into the same folder as the original. You can adjust this setting within Options at the bottom of the AI Super-Resolution dialog.

How to apply Batch AI Super-Resolution
To enhance multiple images at once with AI Super-Resolution, perform the following:
- Find the images you want to enhance in Manage mode and do one of the following:
- Press Batch | AI Super-Resolution | AI Super-Resolution...
- Right-click on an image or images, and select Batch | AI Super-Resolution | AI Super-Resolution...
- Press Control + S.
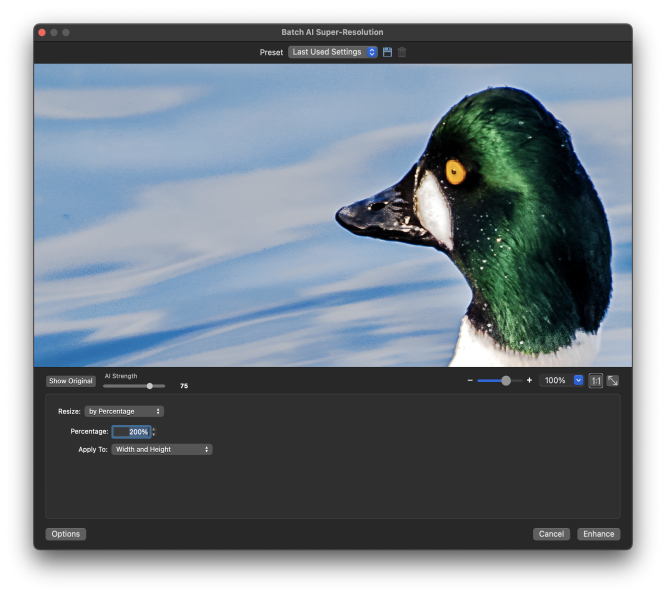
- In the Batch AI Super-Resolution dialog, choose your preferred settings. The preview will automatically generate a new preview whenever parameters are changed so you can always see what it looks like in real-time.
- Click Enhance to apply Super Resolution to your images. The enhanced images will be saved by default into the same folder as the originals. You can adjust this setting within Options at the bottom of the Batch AI Super-Resolution dialog.
Only the first image selected will display in the Preview when using multiple images in Batch AI Super-Resolution.
Settings:
There are five option settings that are available no matter which measurement mode you use:
|
Show Original |
Shows the original image before any modifications for quick comparison. |
|
AI Strength |
Adjust the slider to increase or decrease the amount of influence the AI has in the enhancement. |
|
Zoom |
Adjust the zoom of the current preview display. |
|
Actual Size |
Sets the preview display to show the Actual Size of the image. |
|
Fit Image |
Sets the preview display to fit the image within the preview window. |
Resizing Options
|
Resize Method |
Setting |
Explanation |
|---|---|---|
|
Percentage |
||
|
Apply To: |
The percentage defaults at 200%, but can be adjusted to whatever you need up to a maximum of 400%. The Apply To: dropdown menu allows you to choose what dimensions are impacted by AI Super-Resolution, including Width, Height, or Width and Height. |
|
|
Size in Pixels |
||
|
|
Width |
Enter a new width for the images in pixels. |
|
Height |
Enter a new height for the images in pixels. |
|
|
Resize |
Choose how to scale the images. Select one of the following options:
|
|
|
Preserve original aspect ratio |
Check this box to keep the width-to-height ratio of the original images. |
|
|
Fit within |
Specifies whether the aspect ratio is maintained based on the specified width. For more information about how the different combinations affect the images, see Pixel resize options and resulting action. |
|
|
Actual or Print Size |
||
|
Width |
Enter a new width for the images in pixels. |
|
|
|
Units |
Choose from inches, cm (centimeters), mm (millimeters), or pixels. |
|
Height |
Enter a new height for the images in pixels. |
|
|
Resolution |
Enter a resolution for the images in pixels per inch. |
|
|
Resize |
Choose how to scale the images. Select one of the following options:
|
|
|
Preserve original aspect ratio |
Check this box to keep the width-to-height ratio of the original images. |
|
|
Fit within |
Specifies whether the aspect ratio is maintained based on the specified width. For more information about how the different combinations affect the images, see Pixel resize options and resulting action. |
|
|
Options |
||
|
|
Output File Format |
|
|
File options |
|
|