Using Selections
Use Selections to isolate an area of a photo in order to apply edits or filters to only that area, rather than the whole photo. There are
To Use a Selection Tool:
- In Edit mode, at the top of the panel, select the button for one of the following selection tools:
You can use Selections with the following Edit tools:
- Enhance: Skin Tune
- Add: Vignette, Special Effects, Tilt-Shift, Drawing tools, Grain
- Exposure/Lighting: Exposure, Levels, Auto Levels, Tone Curves, Light EQ™, Dehaze, Dodge and Burn
- Color: White Balance, Color EQ, Convert to Black and White, Split Tone
- Detail: Sharpen, Blur, Noise, Clarity, Detail Brush, Chromatic Aberration
The Selection Tools
-
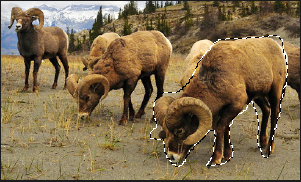
 Freehand Lasso: click the left mouse button and drag the cursor to draw around the area that you wish to select. As you draw, a line appears showing where you have drawn. When you release the mouse, the end of the line joins to the start automatically to complete the selection. The whole selection animates and looks like marching ants.
 -
 Magic Wand: click on any area of the image and all the pixels the same color are included in the selection. You can choose whether to select only the same color pixels that are actually touching the one you clicked, or all the pixels in the photo that are similar. You can increase the threshold to include more pixels in the selection. The lower the threshold, the more similar a pixel has to be to the one clicked in order to be included. The greater the threshold, the more different a pixel can be and still be in the selection.
 -
 Rectangular or
  Elliptical: click and drag either a rectangle or an ellipse that begins where you first click and ends when you release the mouse. Hold Shift when using the Rectangular Selection tool to make it into an equilateral Square shape, or while using the Elliptical Selection tool to make it into an equilateral Circular shape.
 -
 Shape Selection: click on any area of the image to begin the selection. As you move your mouse, the selection will follow your cursor. To change the direction of the selection line, click the left mouse button. Double-click to complete the selection. The points dropped during selection are corner nodes. To delete corner nodes, right click on one, and select delete. To add curve nodes to a selection, once the corner nodes are in place, click and drag any line in between two corner nodes to produce a curved line. When finished, select Commit to save, and Discard to delete.
Using the Selection Tools
To Use the Lasso:
- Select the Lasso button.
- On the image, click and hold down the left mouse button as you draw around the area you want to select.
- Release the mouse button to complete the selection.
- To clear the selection, click anywhere on the image (for the Lasso , Rectangular, or Elliptical selection).
- To add to an existing selection, hold down Shift, or press the Add to selection button in the Context bar, and draw a shape that includes any part of the original selection line.

- To add multiple areas into your selection, hold down Shift, or press the Add to selection button in the Context bar and draw around any part of the image.
- To subtract from a selection, hold down Ctrl, or press the Subtract from selection button in the Context bar, and draw a shape that includes part of the original selection, or encircles it completely.

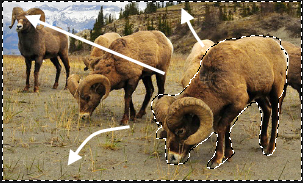
- If you wish to apply edits or effects to the outside areas of the image, you need to click Select | Inverse to reverse the selected area.
When you release the mouse, the original selection expands to include the outer edge of your addition.
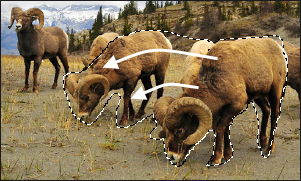
As long as you do not touch the line of any other selection, you can add several separate areas to a selection.
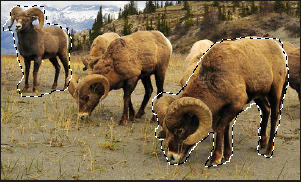
Now the selection includes all the outside areas of the image with the central area outside the selection.
You can preview the selection mask by holding down the Preview button: 
You can select an editing tool or a special effect to apply to the selection.
To Use the Magic Wand:
- Select the Magic Wand button.
- Click any color in the image.
- Do any of the following:
- Slide the Threshold slider to adjust the number of pixels to be included or excluded. The Threshold slider sets how similar a pixel needs to be to the one you clicked in order to be included in the selection.
- Click the Connected checkbox if you want to include only pixels that are touching the one you clicked.
- Hold down Shift and click around the selection to include more pixels.
- Hold down Ctrl and click around the selection to remove pixels from the selection.
- From the Wand type drop-down list, select one of the following:
- Brightness: selects pixels similar in brightness to the area of the image you clicked.
- Color: selects pixels similar in hue and brightness to the area of the image you clicked.
- RGB: selects pixels with red, green, and blue combination similar to the area of the image you clicked.
Color is generally your best option.
You can preview the selection mask by holding down the Preview button:
You can select an editing tool or a special effect to apply to the selection.
To Use the Rectangular or Elliptical Selection Tool:
- Select either the Rectangular or Elliptical button.
- Click and drag to draw the selection on the image.
- Do any of the following:
- To add to an existing selection, hold down Shift, or use the Add to selection button , and drag another selection that includes any part of the original selection line. Release the mouse and the selection now includes the additional area.
- To add multiple areas to your selection, hold down Shift and drag as many as you want.
- To subtract from an existing selection, hold down Ctrl, or use the Subtract from selection button , and drag another selection that intersects with the one you want to reduce. Release the mouse and any part that was inside the new selection is removed.
- To add to an existing selection, hold down Shift, or use the Add to selection button
You can preview the selection mask by holding down the Preview button:
You can select an editing tool or a special effect to apply to the selection.
To Use the Shape Selection Tool:
- Select theShape button.
- Click anywhere on the image to start your selection.
- Click again to change the direction of the selection line.
- Double-click to complete the selection.
- Do any of the following:
- To add to an existing selection, hold down Shift, or use the Add to selection button , and drag another selection that includes any part of the original selection line. Double-click and the selection now includes the additional area.
- To add multiple areas to your selection, hold down Shift and drag as many as you want.
- To subtract from an existing selection, hold down Ctrl, or use the Subtract from selection button , and drag another selection that intersects with the one you want to reduce. Double-click and any part that was inside the new selection is removed.
- To add to an existing selection, hold down Shift, or use the Add to selection button
You can preview the selection mask by holding down the Preview button:
You can select an editing tool or a special effect to apply to the selection.
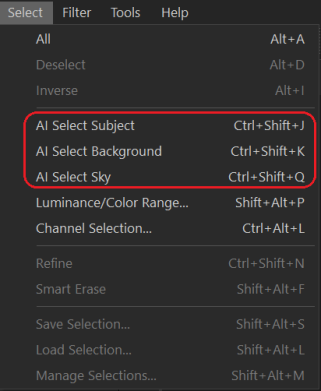
To use Select Background:
You can use the Select Background tool to automatically select the background in your image.
Click Select | AI Select Background or press Ctrl + Shift + J.
To use Select Subject:
You can use the Select Subject tool to automatically select the subject in your image.
Click Select | AI Select Subject or press Ctrl + Shift + K.
To use Select Sky:
You can use the Select Sky tool to automatically select the sky in your image.
Click Select | AI Select Sky or press Ctrl + Shift + Q.
Combining the Tools
You can use the Selection tools separately or in combination. For example, you can use the Magic Wand to select most of a particular color, then switch to the Freehand Lasso to add to, or subtract from, the selection. Or you could use the Rectangular selection to select a large general area, then refine it using the Freehand Lasso.
To Combine Selection Tools:
- Choose a tool and make a selection.
- Switch to another tool.
- Press the Add to selection button.
- Make another selection.
Saving Selections as Presets:
You can save your settings as a preset for future use. After you have made a selection, click Select | Save Selection...
To use a previously saved selection, click Select | Load Selection...
To delete a saved selection, click Select | Manage Selections...
Refining Selections
Once you make a selection with one of the selection tools, you can make the selection larger or smaller, which can make editing easier. This process shifts the edge of your selection, or feathers it to soften it.
To Refine a Selection:
- Make a selection using one of the selection tools above.
- Click Select | Refine or press Ctrl+ Shift + N.
- In the Refine Selection panel, use the Shift Edge slider to bring the edge in by sliding left, or move it out by sliding right. Use the Feathering slider to soften the edges of your selection, which can result in a smoother transition.
- Click Done to save your refined selection.
You can save your refined selection as a preset.
Targeting Selections
You can target selections to specific color tones and brightness values, as well as skin tones.
To Select Pixels by Color or Tone:
- Click Select | Pixel Targeting...
- On the Pixel Targeting panel, configure the settings as described below.
- Press OK. Your targeted colors or tones will be selected.
Luminosity Selection
You can create a selection based on the brightness in the image. The brighter a pixel is, the stronger the selection will be on that pixel.
To Select Pixels by Brightness:
Click Select | Luminosity Selection.