You are here: Edit Mode > Using Selections Tools > Using Selections
Using Selections
Use Selections to isolate an area of a photo to apply edits or filters to only that area, rather than the whole photo. There are three different selection tools and each selects an area of a photo in a unique way. The controls available change depending on which tool you select.
You can save your settings as a preset for future use.
To use the Selections tool:
- In Edit mode, in the Selections group, click Selections.
- Select one of the tools: Freehand Lasso, Magic Wand, Marquee. See below for more detailed steps for using these tools.
You can also quickly access the Selections tool by clicking on the Create Selection button at the top when using some of the tools in Edit. Once you make your selection and click Done to return to the Edit tool, you can modify your selection by clicking Modify Selection.
You can use Selections with the following Edit tools:
- Add: Vignette, Special Effect
- Exposure/Lighting: Exposure, Levels, Auto Levels, Tone Curves, Lighting
- Color: White Balance, Advanced Color, Color Balance, Convert to Black and White
- Detail: Sharpen, Blur, Noise, Clarity
The selection tools
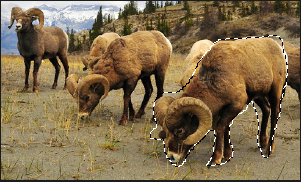
- Freehand Lasso: Click the left mouse button and drag the cursor to draw around the area that you wish to select. As you draw, a line appears showing where you have drawn. When you release the mouse, the end of the line joins to the start automatically to complete the selection. The whole selection animates and looks like marching ants.
- Magic Wand: Click on any area of the image and all the pixels the same color are included in the selection. You can choose whether to select only the same color pixels that are actually touching the one you clicked, or all the pixels in the photo that are similar. You can increase the threshold to include more pixels in the selection. The lower the threshold, the more similar a pixel has to be to the one clicked to be included. The greater the threshold, the more different a pixel can be and still be in the selection.
- Marquee: Click and drag either a rectangle or an ellipse that begins where you first click and ends when you release the mouse.
Combining the tools
You can use the Selection tools separately or in combination. For example, you can use the Magic Wand to select most of a particular color, then switch to the Freehand Lasso to add to, or subtract from, the selection. Or you could use the Marquee to select a large general area, then refine it using the Freehand Lasso.
To use the Freehand Lasso:
- Select Freehand Lasso.
- On the image, click and hold down the left mouse button as you draw around the area you want to select.
- Release the mouse button to complete the selection.
- To clear the selection, click anywhere on the image (for the Freehand Lasso or Marquee) or click Clear.
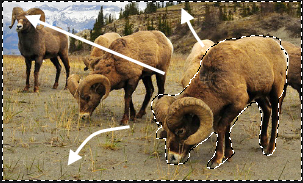
- To add to an existing selection, hold down SHIFT and draw a shape that includes any part of the original selection line.
When you release the mouse, the original selection expands to include the outer edge of your addition.
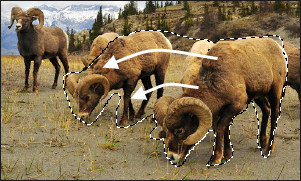
- To add multiple areas into your selection, hold down SHIFT and draw around any part of the image.
As long as you do not touch the line of any other selection, you can add several separate areas to a selection.

- To subtract from a selection, hold down CTRL and draw a shape that includes part of the original selection, or encircles it completely.
- If you wish to apply edits or effects to the outside areas of the image, you need to click Invert to reverse the selected area.
Now the selection includes all the outside areas of the image with the central area outside the selection.
- Click Done.
You return to the Edit mode menu, where you can select an editing tool or a special effect to apply to the selection.
To use the Magic Wand:
- Select Magic Wand.
- Click any color in the image.
- Do any of the following:
- Slide the Threshold slider to adjust the number of pixels to be included or excluded. The Threshold slider sets how similar a pixel needs to be to the one you clicked in order to be included in the selection.
- Click the Connected radio button if you want to include only pixels that are touching the one you clicked.
- Click the Not connected radio button if you want to include all the pixels that are similar to the one you clicked.
- Hold down SHIFT and click around the selection to include more pixels.
- Hold down CTRL and click around the selection to remove pixels from the selection.
- Click Invert to swap your selection to the opposite area from the original, usually the outer part of the image.
- From the Wand Type drop-down list, select one of the following:
- Brightness: Selects pixels similar in brightness to the area of the image you clicked.
- Color: Selects pixels similar in hue to the area of the image you clicked.
- RGB: Selects pixels with red, green and blue combination similar to the area of the image you clicked.
- Click Done.
You return to the Edit mode menu, where you can select an editing tool or a special effect to apply to the selection.
To use the Marquee:
- Select Marquee.
- Select either Rectangle or Ellipse as the shape for your marquee.
- Click and drag to draw the selection on the image.
- Do any of the following:
- To add to an existing marquee, hold down SHIFT and drag another marquee that includes any part of the original selection line. Release the mouse and the selection now includes the additional area.
- To add multiple marquees to your selection, hold down SHIFT and drag as many as you want. As long as none of the edges touch, you can continue adding areas to the selection.
- To subtract from an existing marquee, hold down CTRL and drag another marquee that intersects with the one you want to reduce. Release the mouse and any part that was inside the new marquee is removed.
- Click Done.
You return to the Edit mode menu, where you can select an editing tool or a special effect to apply to the selection.
You can right-click a slider to reset to the default value.
See also: