Using Face Detection and Recognition in View Mode
You can use Face Detection to detect people in images you browse in View mode. You can also import face data from other programs in View mode.
This process will be expedited if you have allowed Face Detection to finish scanning in Manage mode on the folder you are currently viewing.
You can assign names to the detected faces in View mode using the Face Detection pane or Face tool. Naming faces will assist ACDSee with recognizing individuals in future images. This is referred to as facial recognition. The more often a person is named, the more likely they will be recognized, saving you time in the future. You can also improve your results by correcting names mistakenly assigned to faces by ACDSee. The sooner the correction is made, the less likely it will reoccur. Once you have named a face one or more times, ACDSee may suggest this name in future faces. See the Suggestions section below.
Assigned names will allow you to search for images using the names of the people in them. You can do this using the Search functions in Manage mode, as well as the People group in the Catalog pane. You can also manage the names assigned to faces using People mode.
Face Detection is enabled by default. Face Detection is only available on supported image file types.
You cannot run Face Detection on files in unsupported locations, such as archives, phones, and photo disks, or on files excluded from the database.
To Enable or Disable Face Detection:
Choose Tools | Options | Face Detection and check/uncheck the Automatically detect faces in images checkbox.
When you browse images in View mode, Face Detection will scan each image for faces as you open it.
To Open the Face Detection Pane:
Choose Panes | Face Detection.
Detected faces will appear in the Face Detection pane.
In the Bottom Toolbar, click the Show Face Outlines button or press Shift + B.
To Name Detected Faces:
- In the Bottom Toolbar, click the Face Tool button or press Shift + F.

- In the field below the face outline, enter the name of the detected face.
- Press Enter.
You can use Tab to move your cursor between name fields on the image, as well as on the Face Detection pane.
To Edit Face Outlines:
- In the Bottom Toolbar, click the Face Tool button or press Shift + F.
- Use your cursor to move, expand, or contract the outline.
To Draw Outlines Around and Name Undetected Faces:
- In the Bottom Toolbar, click the Face Tool button or press Shift + F.
- Click and drag to draw a face outline on the image.
- In the field below the face outline, enter a name for the face.
Outlining and naming undetected faces will not improve ACDSee's recognition of the individual.
To Import Embedded Face Data From Lightroom or Picasa:
- In View Mode, select Tools | Face Detection | Import Lightroom or Picasa Face Data.
- Your face data will import and the face data will be added to your database.
When you import Lightroom or Picasa face data, it will overwrite any existing face data on the image.
Suggestions
Once you have assigned a name one or more times, ACDSee may suggest this name for faces in future images. Suggestions can improve themselves over time, and even assign themselves based on similarity.
You must select the Face tool in order to interact with suggestions in the main viewer.
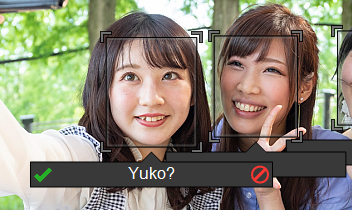
To Deny or Confirm Suggestions:
Click the green checkmark to confirm the suggested name, or the red deny symbol to reject the suggested name.
You can ignore incorrect suggestions without negative consequences. Denying a suggestion will not affect suggestions on other photos. You can also edit suggestions in the name field and press Enter.