
In Edit mode, you can use the Layers pane to add effects and shapes to your photos in layers, perform photo manipulations, create composite images, and much more. Layers allow you to work on a single element of an image without disturbing others. Layers can be as transparent or opaque as you desire. This allows you to stack layers to achieve the level of visibility you want for the elements you add on each layer. You can also hide layers.
You can use layers in conjunction with image effects and adjustment tools, drawing tools, text, and more. Effects and adjustments will be applied to the layer selected in the Layers pane. You can also create a blank image and layer other elements on top of it.
Geometry adjustments are applied to all layers.
You have the option of adding text or watermarks to a new layer.
To Open the Layers Pane:
With an image open in Edit mode, go to View | Layers.
In the Layers pane, you will see Layer 1 with your image on it. At this point, you have the option of editing the photo, or adding additional layers with other photos or drawing elements, such as shapes, on them. You can also create a mask to hide or reveal portions of the layers below.
To Add a Layer:
Do one of the following:

To edit a layer, select the layer in the Layers pane.
To Add Another Image to the Layers Pane:
Do one of the following:
To Set Layer Visibility:
Select the Layer and press the Hide Layer button.
|
Show Layer |

|
|
Hide Layer |

|
To Delete a Layer:
Select the layer and press the Delete Layer button. 
To Duplicate a Layer:
Select the layer you would like to duplicate and press the Duplicate button. 
To Move a Layer:
In the Layers pane, select the layer and drag it up or down.
To Name a Layer:
To Merge a Layer:
You can merge a layer with the layer below.

To Flatten an Image:
To merge all layers into a single image, do the following:
Choose Layer | Flatten Layers.
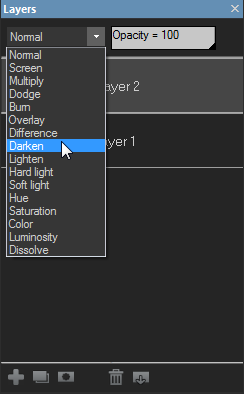
To Change a Layer's Blend Mode and Opacity:
Blend modes describe how the layers blend together. Blending sticks with the layer it was applied to, regardless of the layer order being changed. Opacity describes how transparent the layer is.
Saving Layered Images:
When you save a layered image, the Save Image As dialog opens with the file format set to .acdc by default. By saving in the .acdc file format, your layers will remain accessible should you re-open the image in Edit mode in the future.
The .acdc file format will not be displayed in the Save Image As dialog by default if you have flattened or merged all layers.
To Create a New Image:
You can create a new, blank image.
To add a layer mask, see Using Masks with Layers.