Using the Develop Brush
The Develop Brush makes a variety of edits to specific areas of a photo. Adjust the Exposure, Saturation, Vibrance, Temperature, Tint, Fill Light, Contrast, Clarity, and Color Strength, as well as Color EQ, Tone Curves, and Sharpness in a photo by brushing on the effects. For example, instead of adding fill light to an entire photo, only add it to certain areas, such as backlit subjects. Apply up to 24 masks to separate areas in an image and assign each with unique effect settings.
Develop Brush
The Develop Brush button  is located in the Tune and Detail tabs.
To use the Develop Brush:
- In the Develop Tools pane, in the Tune or Detail tab, click Masking, then Brush in the Masking Group to open the control panel and enter Brush masking mode.
- Specify the brush settings in the panel, or while working, as described in the table below.
- Start painting the effects onto a photo.
- Adjust the sliders to get the desired effect.
- Click Apply or Done.
To apply another mask, (up to 24 are available), press the + button at the bottom and select the masking type. The new mask box will become visible to the right of the previous mask box. Return to any mask by selecting its respective mask icon. A blue outline represents the mask currently selected. Disable or re-enable any mask by using the Disable/Enable Mask buttons.
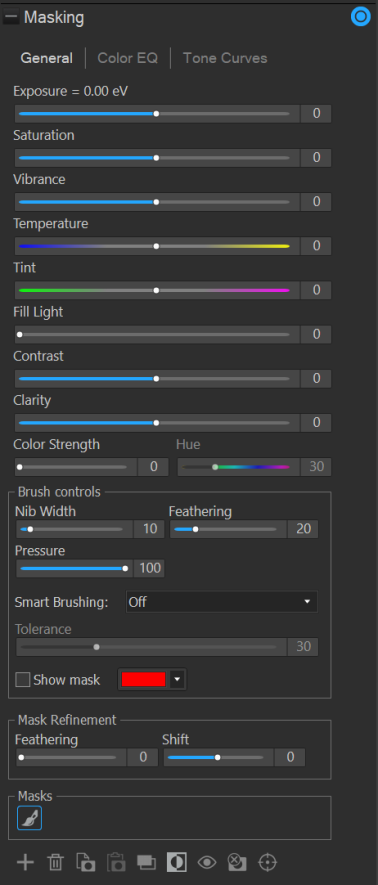
Hovering over a brush button will reveal that specific brush's strokes on the image. The brush strokes will appear in the color selected in the drop-down next to the Show mask checkbox. (By default, the color is red.) Alternatively, hold down the S key to see the brush strokes on the image.
If all of the sliders are at zero, brush strokes will appear in color, (as selected in the drop-down next to the Show mask checkbox), as no changes have been made to the image.
To disable a mask:
To disable a mask, select the mask layer you wish to hide, and click on the Disable Currently Selected Mask button to hide the mask layer.
To re-enable a mask:
To re-enable a mask, select the mask layer you wish to make visible again and click on the Enable Currently Selected Mask button to show the mask layer again.
Creating Straight Lines:
Hold the Shift key while using the Develop Brush to lock the direction the brush can move in horizontally, or vertically. For example, holding Shift, then clicking and dragging horizontally will lock the cursor into horizontal only so long as shift is being held. Release Shift to return to free hand brushing. You can even release Shift to return to free hand brushing, then press it again while still drawing the same line to unlock and re-lock the brush at will.
Creating Diagonal Lines:
Using the Develop Brush, Gemstone can create straight diagonal lines by placing two points on the image. Place the cursor where you want the line to begin, press and hold Shift, then Left-Click on the image to create a point. Let go of Shift, and move the brush to where the line will end, press and hold Shift, then Left-Click again to create a second point. A straight line will fill in between these two points.
|
Nib Width |
Adjusts the size of the brush. Use the mouse wheel to adjust nib width or adjust the Nib Width slider. |
||
|
Pressure |
Adjust the slider to control the strength of the brush. |
||
|
Smart Brushing |
See the Smart Brushing section below. |
||
|
Tolerance |
Only enabled if a Smart Brushing option is selected, the Tolerance slider increases or decreases the range of pixels affected by the Smart Brush. |
||
|
Add brush stroke |
Brush while holding the left mouse button down. |
||
|
Erase brush stroke |
Brush while holding the right mouse button down. |
||
|
Show mask |
When this option is enabled, the currently selected brush's strokes will be displayed in the color selected in the adjacent color selection tool. This is helpful when brushing a complex area with a subtle effect because it can be hard to tell which spots have been covered. The color of the brushed area can be changed to stand out from the colors of the image. |
||
|
Mask Preview Color |
Opens the Colors dialog used to select a color for brush strokes. |
||
|
Add a new mask layer |

|
Adds a new mask layer to the project. | |
|
Delete the currently selected mask |

|
Deletes the currently selected mask layer from the project. | |
|
Copy the currently selected mask |

|
Copies the currently selected mask layer onto the clipboard. | |
|
Paste the currently selected mask |

|
Pastes the mask currently saved to the clipboard. | |
|
Duplicate the currently selected mask |

|
Creates a duplicate mask layer using the currently selected mask. | |
|
Invert the currently selected mask |

|
Toggle this option to invert the brush strokes of the currently selected brush. This makes brushed areas no longer brushed and untouched areas brushed. This is useful for instances where the majority of the image is brushed and a small section untouched. Simply brush only the small area to be left unbrushed, then invert the brush strokes. |
|
|
Disable the currently selected mask |

|
Disables the currently selected mask layer, preventing the layer from being visible. | |
|
Enable the currently selected mask |

|
Enables the currently selected mask layer, preventing the layer from being visible. | |
|
Clear the currently selected mask |
|
Clears the currently selected mask layer of any brush strokes. |
|
|
Pixel Targeting |
|
Opens the Pixel Targeting dialog for precise color selection. (see Pixel Targeting for more information) |
|
Feathering |
Adjust the slider to control the softness of the transition between the brush strokes and the image. Use Ctrl + mouse wheel to adjust the amount of feathering or adjust the Feathering slider. |
|
|
Shift |
Adjust the edges of a mask by expanding or contracting them. Shifting the mask outward increases its coverage, making the masked area larger, while shifting inward reduces it's coverage, tightening the selection. |
Using the Develop Brush on the Tune Tab
|
General |
||||||||||||
|
|
Exposure |
Drag the slider to the right to increase exposure, or drag to the left to decrease exposure. One eV is equivalent to one stop of exposure change. Brush on exposure. |
||||||||||
|
Saturation |
Drag the slider to the right to increase saturation, or to the left to decrease saturation. Brush on saturation. |
|||||||||||
|
Vibrance |
Drag the slider to the right to increase vibrance, or to the left to decrease vibrance. Increasing the vibrance does not affect skin tone in an image. This is unlike saturation, which intensifies all colors equally. Brush on vibrance. |
|||||||||||
|
Temperature |
Drag the Temperature slider to the left (more blue) or right (more yellow) to select a specific color temperature. Brush on white balance. |
|||||||||||
|
Tint |
Drag the Tint slider to the left (more green) or right (more magenta) to match the white balance settings that you selected when you took the photo. Brush on white balance. |
|||||||||||
|
Fill Light |
Drag the slider to the right to add light to the darkest areas of the image. Brush on fill light. |
|||||||||||
|
Contrast |
Drag the slider to the right to increase contrast, or to the left to decrease contrast. Brush on contrast. |
|||||||||||
|
Clarity |
The Clarity tool adds subtle definition to the details in your image. Use the Clarity slider to enhance the contrast of midtones, without overpowering the shadows and highlights. Drag the slider to the right to increase clarity, or to the left to reverse clarity. Brush on clarity. |
|||||||||||
|
Color Strength |
Use the Color Overlay sliders to add tint to your image without affecting brightness levels. Set the Color Strength slider, then move the Color slider to the desired color band. With Color Strength set to 0, no color will be applied. Brush on color. |
|||||||||||
|
Color EQ |
||||||||||||
|
|
Drag the color sliders to adjust individual colors' saturation, brightness, hue, and contrast on their respective tabs. Drag the sliders right for more intensity, or left for less intensity. Or, enter a number into the fields for precise adjustments. Select one of the following icons:
Select a precise color to adjust by dragging directly on the image. In order to toggle the Color Selector on, click the Color Selector icon. Place your cursor on the image for the double arrow icon to appear. Then click and drag up or down to adjust the colors beneath the double arrow icon. The affected color sliders automatically adjust as you move your cursor. However, no change will occur to the image until you brush on the adjustment. Brush on Color EQ. |
|||||||||||
|
Tone Curves |
||||||||||||
|
|
Move the curve and/or add points by clicking to adjust the tonal range of the image. Select any of the color icons on the right side of the graph to target the adjustment to one of the following color channels:
Brush on a tone curves adjustment. Delete points on a curve by right-clicking and choosing Delete point. Or, delete a point by dragging it off of the graph. |
|||||||||||

Using the Develop Brush on the Detail Tab
| Sharpness | Move the slider to the right to brush on sharpness, or move the slider to the left to brush on blur. |
| Luminance Noise Reduction | Luminance noise is random variations of brightness, and particularly in gray areas, may appear spotted when there should be a solid color in the area of the image. Slide to the right to add Luminance Noise Reduction. |
| Color Noise Reduction | Color noise is random variations of color in the image. Slide to the right to add Color Noise Reduction. |
Right-click a slider to reset to the default value.
Smart Brushing
Use the Smart Brush to target brushing to specific colors, brightness values, or a combination of color and brightness. The Smart Brush only affects pixels similar in value to the pixel in the center of the brush stroke, and allows you to apply adjustments to those pixels.
To use the Smart Brush:
- In the Develop Tools pane, on the Tune or Detail tab, click the Brush button
 at the top of the pane to open the control panel and enter Brushing mode.
 - Select an option from the Smart Brushing drop-down menu:
- Use the Tolerance slider to increase or decrease the range of pixels affected by the Smart Brush.
- Place the cursor over the color or brightness to be selected and begin painting on the effect.
- Adjust the sliders to get the desired effect.
- Click Apply or Done.
|
Color |
Uses the color of pixels similar in value to the pixel in the center of the brush stroke to determine if they should be brushed on, depending on the Tolerance slider setting. |
|
|
Brightness |
Uses the brightness of pixels similar in value to the pixel in the center of the brush stroke to determine if they should be brushed on, depending on the Tolerance slider setting. |
|
|
Magic |
Uses a combination of the color and brightness values similar to the pixel in the center of the brush stroke to determine which pixels should be brushed on, depending on the Tolerance slider setting. |
To apply another brush, (up to eight are available), select the next brush in the sequence at the bottom of the panel. The box above the brush will become enabled. The checkmarks represent the activated smart brushes, while the selected brush icon (highlighted in blue) represents the currently enabled smart brush. Return to any of the brushes at any given time by selecting its respective brush icon. A blue brush represents a smart brush that has been used. Deactivate or re-activate any brush by disabling or re-enabling its respective checkbox.
Hold down Ctrl prior to making a brush stroke to temporarily disable the Smart Brush. Use this keyboard shortcut on a stroke by stroke basis.
Erase brush strokes by right-clicking and brushing over the strokes.
To Turn off Smart Brushing:
Select "Off" from the Smart Brushing drop-down menu.