Adjusting Audio Levels
Audio Keyframes can be added to audio clips using the Properties panel to increase or decrease volume levels, pan from left to right audio channels, adjust pitch, and take advantage of equalizer presets.
Control audio speed by using the Clip Speed effect.
To detach audio from video clips:
Right-click the clip on the Timeline and select Detach Audio from the context menu, or select the clip and press Alt + S. The audio will separate onto a new track above, allowing for independent movement.
To raise or lower the volume of an audio clip:
- Right-click the clip on the Timeline and select Detach Audio from the context menu.
- The audio will separate onto a new track above the original track. Click on the audio track to bring it into focus in the Properties panel.
- In the Properties panel, you can select from a variety of options to adjust your audio.
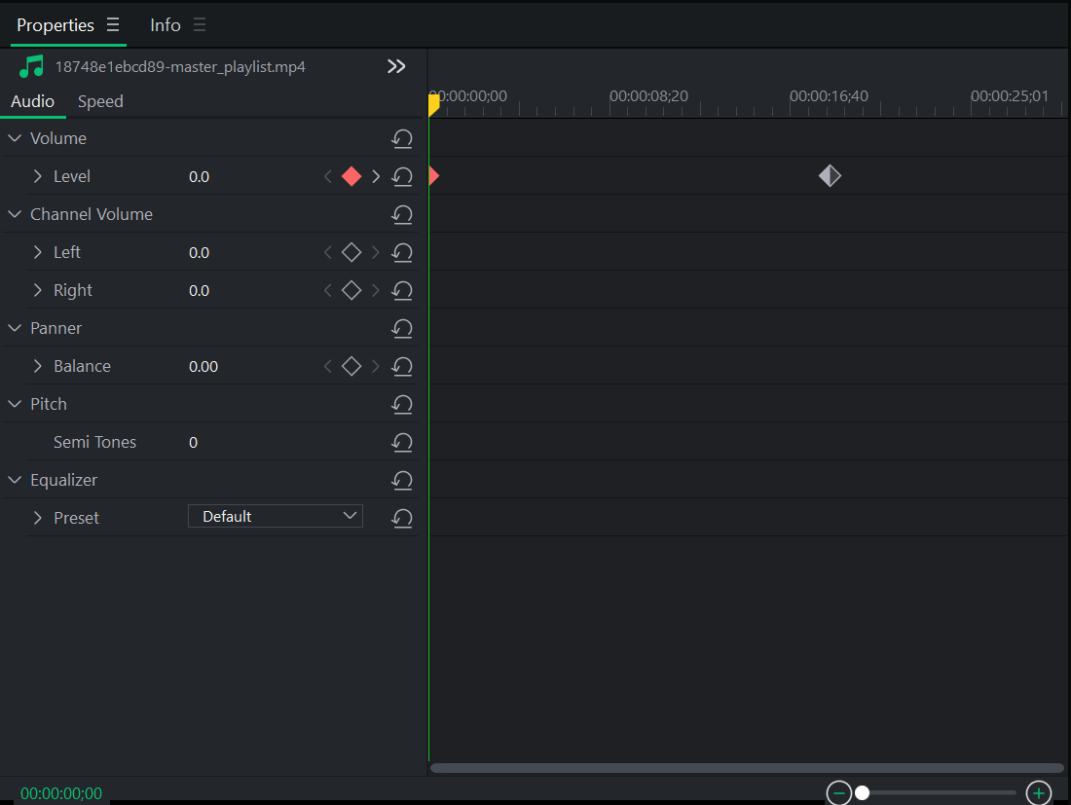
- Clicking on the diamond to the right of an adjustment option such as Level will place a Keyframe on Timeline in the properties panel. For example, if you have Level 0.0, and place a Keyframe down at the start like in the image above, it tells LUXEA Pro Video Editor 7 that the volume is to begin at a neutral level, no increase or decrease in dB. Then move the Playhead to where the next adjustment will be and press the diamond Keyframe button again. This will place a second Keyframe on the page. By highlighting and setting the volume level for this Keyframe, LUXEA Pro Video Editor 7 now knows that Keyframe #1 will set the volume to neutral, and it needs to increase to the set volume by the time it reaches Keyframe #2.
Changing Playback Volume
Audio volume for playing back clips can be adjusted in app. While viewing a clip in the Display Area, hover over the Speaker icon  and adjust the volume level as needed.
This will only adjust the playback volume for your speakers, and not impact the volume of a finished project.
Audio Speed
Use the Clip Speed effect to control the speed and overall duration of audio only.
To speed up or slow down an audio track:
- Right-click a clip on the Timeline and select Detach Audio from the context menu, or press Alt + S.
- With clips added to the Timeline, select Clip Speed.
- Select the speed preset to adjust the clip with.
Clip Speed
The Clip Speed effect controls the speed and overall duration of media assets.
To speed up or slow down a media asset:
- With clips added to the Timeline, select Clip Speed.
- Select the speed preset to adjust the clip with.
Fading Audio In and Out:
Take advantage of preset audio tools like the Fade In and Fade Out options. By setting Fade In, the audio of a Clip will begin softly and build to its natural volume level. By setting Fade Out, the audio of a Clip will soften and fade away as the Clip reaches its end.
To Fade In Audio:
- With the clip selected in the Timeline, click on Clip in the top menu.
- Mouse over Audio and select Fade In, or press Shift + Alt + G.
To Fade Out Audio:
- With the clip selected in the Timeline, click on Clip in the top menu.
- Mouse over Audio and select Fade Out, or press Shift + Alt + D.
Audio Property Panel Options
|
Properties Panel Options |
||
|
|
Volume: Level |
Adjust the volume of both audio channels together. |
|
|
Channel Volume: Left |
Adjust the volume of the left audio channel. |
|
|
Channel Volume: Right |
Adjust the volume of the right audio channel. |
|
|
Panner: Balance |
Adjust the panning balance from left to right. |
|
|
Pitch: Semi Tones |
Adjust the pitch by the declared number of semi tones. |
|
|
Equalizer: Presets |
Apply full equalizer presets. These can be transitioned using Keyframes like any other option too. |