Exporting to TikTok
The TikTok tab in the Export tool is used to craft Media Assets destined to be uploaded to TikTok.
The TikTok tab is divided into two sections: the left-hand TikTok Sign-in section and the right-hand Options Section.
To prevent image distortion, select your aspect ratio, such as 9:16 Portrait (Reels, TikTok), in Project Settings prior to exporting. Adjusting the aspect ratio during the export process may cause the video to stretch or squish to fit the new dimensions.
TikTok Sign-in Section
The TikTok Sign-in section contains the TikTok Sign In button. In order to successfully upload a completed project to TikTok, the sign-in procedure must be enacted.
- With Media Assets added to the Timeline, click the Export button located in the upper right-hand corner of the LUXEA Pro 8 interface.
- In the Export tool dialog's TikTok section, click the Sign In button.
- Reply to all prompts until successfully logged into TikTok.
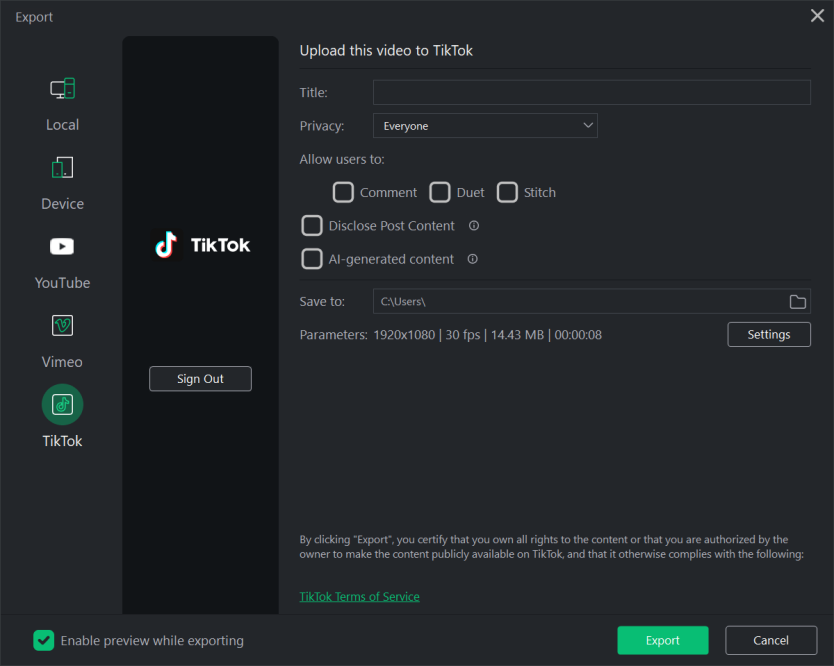
Options Section
The Options Section is used to prepare a project's output for upload to TikTok.
To Produce a TikTok Output:
- With Media Assets added to the Timeline, click the Export button located in the upper right-hand corner of the LUXEA Pro 8 interface.
- In the Export tool dialog, select the TikTok tab and sign-in to TikTok (see To sign-in to TikTok).
- Enter a name in the Title field.
- Make a selection from the Privacy drop-down list. The Privacy field determines how TikTok presents the video to their viewers. Selecting Only you will restrict the video's availability, allowing only you to see it. Selecting Everyone will allow the video to be presented to all of TikTok's users. Selecting Friends will allow the video to be viewable by friends only.
- Choose whether to allow or disable Comments, Duets, or Stitches by selecting the corresponding checkbox.
- Use the default value for the Save To field, or click the adjacent file folder icon to select a new location.
- Accept the default values for the Parameters field, or click the adjacent Settings button to set new size and rate parameters. For more information on the Settings button, see To set custom values for video quality.
- Click the Export button to upload the video to TikTok.
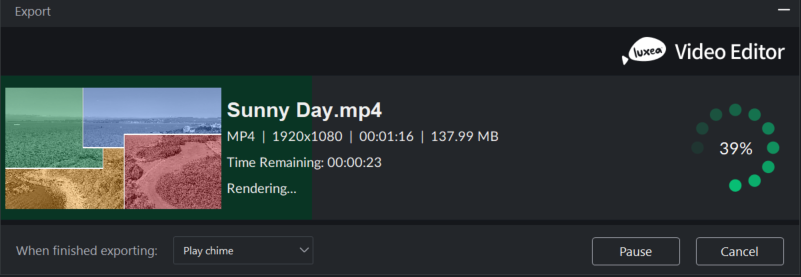
The Export dialog features a progress preview of the project and a dropdown menu with the option to play a Windows chime sound when rendering is complete.
To Set Custom Values for Video Quality:
- Open the Export tool.
- Navigate to the Options section and click the Settings button adjacent to the Parameters field.
- In the resultant Settings dialog, enable one of the Normal, Better, or Best radio buttons.
- Under the Video heading, make selections for the Encoder, Resolution, Frame Rate, and Bitrate drop-down lists.
- Under the Audio heading, make selections for the Encoder, Channel, Sample Rate, and Bitrate drop-down lists.
- Click the OK button.
TikTok applies compression to all uploaded videos. As a result, the playback quality on the platform may be lower than your original exported file.
Video Settings
| Field | Description |
|---|---|
|
Encoder |
Specifies the video data compression type. Compression options vary by format, and include H.264, MPEG-4 |
|
Resolution |
By default, the resolution will reflect the current settings of the Display Area Dimensions. To change the resolution, select a resolution from the drop-down, or select "Custom" from the drop-down list and specify new dimensions in the adjacent Width and Height fields. |
|
Frame Rate |
Determines the frequency of picture refreshes. |
|
Bitrate |
Select the bitrate to determine how much data will go to the screen per second of playback. A higher bitrate allows for a higher quality picture, however, it also increases the file size. |
Audio Settings
| Field | Description |
|---|---|
|
Encoder |
Specifies the audio data compression type. Compression options vary by format, and include AAC, MP3, and Vorbis. |
|
Channel |
From the drop-down menu, select Mono to have the same sound produced from the left and right speakers, or, select Stereo to produce different sounds from the left and right speakers. |
|
Sample Rate |
Sampling describes the data rate of a sound recording. A higher sample rate allows for higher quality sound, however, it also increases the file size. |
|
Bitrate |
Determines how much audio data will go to the speakers per second of playback. A higher bitrate allows for a higher quality sound, however, it also increases the file size. |