Using the AI Object Tool
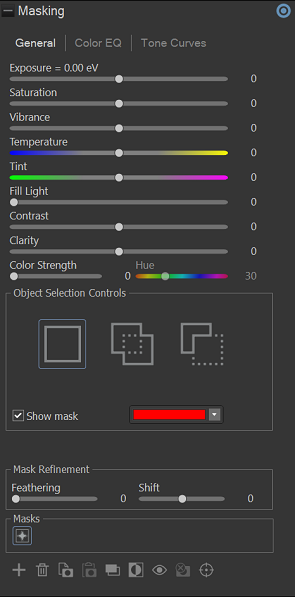
The AI Object tool intelligently identifies objects within the area you designate and automatically creates a mask, allowing for quick and accurate adjustments to specific elements in a photo. Adjust settings for the mask such as the Exposure, Saturation, Vibrance, Temperature, Tint, Fill Light, Contrast, Clarity, and Color Strength, as well as Color EQ, Tone Curves, and Sharpness in one or a series of selection masks over the photo. For example, instead of adding Fill Light to an entire photo, add the fill light to certain areas, such as back-lit subjects.
AI Object Tool
The AI Objects button  displays in the Masking Group of Tune and Detail tabs.
To Use the Gradient Tool:
- In Develop mode, in the Tune or Detail tab, click Masking, and then the AI Objects button
 at the top of the pane to open the control panel and enter AI Object mode.
 - Specify the AI Object settings in the panel as described in the table below.
- Roughly outline the object(s) you would like to have a mask placed over. To make this clearer, check the Show mask checkbox.
- Adjust the sliders to get the effect you want.
- Press Save or Done.
To apply another mask, (up to 24 are available), click the + on the bottom left of the panel and select a masking option. A new icon (related to the type of mask selected) will appear in the Masks section. Your currently selected mask will be outlined in blue. You can reselect any of the masks at any given time by clicking its respective icon.

Object Selection Controls
|
Create a new mask
|
When this option is active, roughly outlining objects will create a new mask and discard any prior masks. |
|
Add to the current mask
|
When this option is active, selecting objects will add them to the current mask. |
|
Subtract from the current mask
|
When this option is active, selecting objects will subtract them from the current mask. |
|
Show mask
|
When this option is checked, your gradient mask will be displayed in the color shown. Alternatively, hold down the S key to see the mask on the image. |
|
Mask Refinement |
|
|
Feathering |
Adjust the slider to control the softness of the transition between the mask and the image. Use Ctrl + mouse wheel to adjust the amount of feathering or adjust the Feathering slider. |
|
Shift |
Adjust the edges of a mask by expanding or contracting them. Moving the slider to the right increases its coverage, making the masked area larger, while moving the slider to the left reduces it's coverage, tightening the selection. |


