Adjusting Color With the Color Wheel
In Develop and Edit mode, you can use the color wheel to adjust precise colors in your image. This lets you change a precise color's saturation, hue, brightness, contrast, and contrast balance. You can also adjust smoothness, which acts like a feathering tool to soften a color's edges. The Color Wheel is particularly useful for common requests like making a blue sky more blue, or brightening dark water that is meant to depict a bright lake.
To Adjust Color Using the Color Wheel:
- Open the Color Wheel using one of the following options:
- In Develop mode, choose Color Wheel from the Tune tab in the Develop Tools pane.
Note: to use the Color Wheel in Develop mode, you must have Color EQ set to High Quality. To ensure this, open Color EQ and choose High Quality from the drop down menu. - In Edit mode, choose Color Wheel from the Color options in the Filter Menu.
- In Develop mode, choose Color Wheel from the Tune tab in the Develop Tools pane.
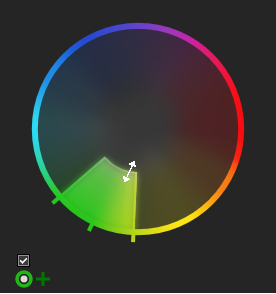
- Choose a color to edit by clicking and dragging the section of the color wheel around, or by using the eyedropper on the image itself. As you move the eyedropper around the image, you will see a dot, known as the hue indicator, move around the wheel to show the where the color you are hovering over sits on the wheel.
- Refine your selection. You can increase or decrease the color selection size by clicking and dragging the double arrows at the edge of your selection on the wheel. You can also refine the color saturation of the selection by clicking and dragging your selection away from the edges of the wheel, or away from the center of the wheel. The less saturated colors are in the center of the wheel and the more saturated colors are towards the edge of the wheel.
To invert the colors you have in the selection, you can click the Invert selection button.

To view the selection you have made with the color wheel, click and hold the Preview selection mask button.

- Adjust the edge of your selection by using the Smoothness slider. This tool softens or sharpens the edges of your selection, working similarly to feathering, to soften or sharpen the cut off point.
- Use the sliders to adjust the selected colors in your image. The individual sliders will have the following effects:
- Saturation: slide left to decrease saturation and slide right to increase saturation.
- Hue: slide left or right to adjust hue.
- Brightness: slide left to decrease brightness and slide right to increase brightness.
- Contrast: slide left to decrease contrast and slide right to increase contrast.
- Contrast Balance: once you have adjusted contrast, you can adjust contrast balance, which changes whether you apply the contrast to the lighter or darker colors in the image.
- Press Done to save your changes and exit the Color Wheel.
To see what your image looked like without the edit, press the Show Previous button in Edit Mode, or press Show Original in Develop mode.
To reset any changes, right-click on either the relevant slider, or the wheel to reset all changes.
To Adjust Multiple Colors Using the Color Wheel:
Once you have made your first color wheel edits, you can make changes to other colors using additional color wheels.
To do this, click on the plus symbol next to the color wheel icon. 
To Delete Edits Made Using the Color Wheel:
You can delete color wheel edits until you save the image as a new file in Develop mode, or until press Apply or Done in Edit mode.
To do this, click on the cross symbol next to your list of color wheel edits. 