Using Masks with Layers
Layer masks allow you to control a layer's level of transparency. While it is easy to control the opacity of a layer globally using the Opacity slider, layer masks are useful when you want to target a particular part of a layer. Use layer masks to hide or reveal portions of the layer beneath. Layer masks are effective for combining multiple images into a single image or for making localized adjustments.
For the types of layer masks - a white layer mask completely covers the layer below it. As you paint on the white layer mask with a black brush, you are brushing "holes" through the mask, allowing you to see through to the layer below. Conversely, a black layer mask is transparent and completely displays the layer below it. As you paint on the black layer mask with a white brush, you are masking the image, covering the layer below.
To Create a Layer Mask:
Do one of the following:
- In the Layers pane, right-click the layer you want to add a layer mask to and select Set Mask White or Set Mask Black.
- Go to Layer | Mask | Set Mask White or Set Mask Black.
- At the bottom of the Layers pane, press the Add layer mask button.

The layer mask will appear as a white or black box in the Layers pane next to the thumbnail of the image on the layer you selected. To perform actions to the layer mask, you must select it in the Layers pane. You can alter the opacity of the layer mask by dragging the Opacity slider at the top of the Layers pane. You can apply any Edit mode adjustment to the layer mask by selecting it and entering the tool.
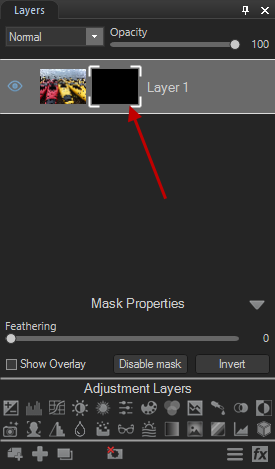
|
Selected white layer mask |
|
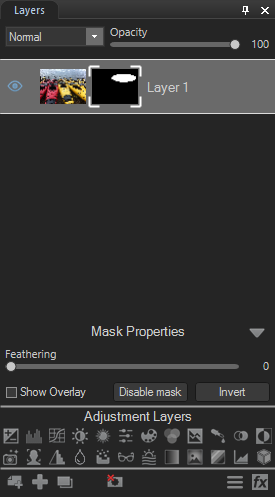
|
Selected black layer mask |
|
Applying Layer Mask:
You can apply a Layer Mask directly to the image.
- Select the layer or mask in the Layers pane.
- Do one of the follow:
- Right-click on the mask and choose Apply Layer Mask
- Choose Layer | Mask | Apply Layer Mask
- Press Ctrl + Alt + M
To Disable a Mask:
You can disable a mask without deleting it. You can even disable it, save your layers as a .acdc file and exit Edit mode, then reopen it in Edit mode at a later date and enable your mask again.
- Select the mask in the Layers pane.
- Do one of the following:
- Right-click on the mask and choose Disable mask from the context menu.
- In the Layers pane, press the Disable mask button.
- Choose Layer | Mask | Disable Mask.
- Press Ctrl + Shift + M.
To Enable a Mask:
- Select the mask in the Layers pane.
- Do one of the following:
- Right-click on the mask and choose Enable mask from the context menu.
- In the Layers pane, press the Enable mask button.
- Choose Layer | Mask | Enable Mask.
- Press Ctrl + Shift + M.
To Use the Mask Preview Option:
When a mask is applied to a selected layer, you can quickly toggle a preview by pressing and holding ] or clicking and holding the "Mask Preview" button at the bottom left of the view window.
Mask Properties
You can adjust the properties of each layer mask on each layer individually using the Mask Properties panel. The adjustments you make are non-destructive, meaning that you can adjust them at any time throughout the editing process.
To Access the Mask Properties Panel:
Select the mask in the Layers pane. The Mask Properties will appear at the bottom of the pane, above Adjustment Layers.
You can make the following adjustments to your layer mask:
|
Feathering |
You can non-destructively feather your mask to avoid sharp edges or a stark contrast between the mask and the layer. Move the slider to blur the edges of the mask. |
|
Invert |
You can non-destructively invert your mask. This will turn a white mask black, and a black mask white. |
Displaying a Mask Overlay:
You can make your mask easier to see by checking the Show Overlay checkbox in the Mask Properties panel.
To Customize the Mask Overlay:
- Right-click on the mask in the Layers pane and choose Mask Overlay Options... from the context menu.
- In the Mask Overlay Options dialog, select one of the following overlay options:
- Press OK.
|
Mask Highlighted |
This option highlights your mask in the color of your choosing. Select a color from the drop-down menu. You can customize the transparency of the mask overlay by using the Opacity slider. |
|
Mask Exposed |
This option highlights the non-masked areas of your layer in the color of your choosing. Select a color from the drop-down menu. You can customize the transparency of the unmasked area by using the Opacity slider. |
The mask overlay is only visible when the layer is selected.
To Edit a Layer Mask:
Select the layer mask in the Layers pane, then choose any adjustment, or drawing or selection tool.
Mask Flexibility
You can create or modify selections from masks.
To Create a Layer Mask From a Selection:
You can make a layer mask from a selection.
- Make a selection.
- Go to Layer | Mask | From Selection.
Or:
- Make a selection.
- Press the Add layer mask button. Or add any adjustment layer by selecting one of the icons from the bottom of the Layers pane. A mask will automatically be made from the selection.
Or:
- Make a selection.
- Right-click the layer and choose Mask From Selection from the context menu.
To Add a Mask to a Selection:
- With the mask selected in the Layers pane, make a selection.
- Right-click the mask and choose Add Mask To Selection.
To Subtract a Mask from a Selection:
- With the mask selected in the Layers pane, make a selection.
- Right-click the mask and choose Subtract Mask From Selection.
To Select the Area Common to the Mask and the Selection:
- With the mask selected in the Layers pane, make a selection.
- Right-click the mask and choose Intersect Mask With Selection.
To Delete Selected Mask Pixels:
See Using Selections.
Creating Layer Masks From Specific Colors and Tones
You can create masks from specific targeted colors and/or tones—and even skin tones.
To Create a Layer Mask by Targeting Colors or Tones:
- Select your layer and set a white or black mask, as described above.
- Right-click the mask and choose Pixel Targeting... from the context menu.
- On the Pixel Targeting panel, configure the settings as described below.
- Press OK. The mask will be created from the targeted colors and/or tones.
The Pixel Targeting Pane
![]()
The Pixel Targeting pane consists of three sections:
- Presets
- Luminance Range
- Color Range
Pixel Targeting Pane Sections
| Presets | Make a selection from the Presets drop-down list, or click the Save Preset icon to populate the new preset to the Presets drop-down list. | ||
|
|
Show Mask Preview |

|
Click the icon to view a preview of the mask that highlights the pixels to be targeted. |
| Reset |

|
Click the icon to remove all of the current image edits and return the image to its original state. | |
| Help |

|
Click the icon to open the Pixel Targeting help file. | |
|
Luminance Range |
The Luminance Range field set is used to target tones of brightness for adjustment. Enable the Luminance Range checkbox to enable the associated functionality. | ||

|
Invert Selection |

|
Click the icon to change the selected pixels to the unselected pixels. |
| Indicator Line |

|
Click the icon to add an indicator line to the Tone Grabber display and produce an eyedropper for indicating where a tone from the image appears in the graph. | |
| Tone Grabber | Use the four slider tabs to make a tonal selection. The area inside the blue box represents the tonal selection. The top two tabs cannot slide past one another. Each of the bottom tabs cannot slide past their own top tab when sliding toward the center. The tonal range is between 0 and 255. A diagonal line between the top and its associated bottom slider tab will produce a feathered selection effect (64 to 0 in the Luminance Range example). A straight line connecting the top and associated bottom slider tab will produce a hard cut-off (192 to 192 in the Luminance Range example). | ||
| Add Detail | Increase the slide value to sharpen the crispness around the edge of the selection. | ||
| Detail Range | If the Add Detail slider has been advanced past a value of "0", the Detail Range slide is enabled for controlling the range of the edge detail added by the Add Detail slider. | ||
|
Color Range |
The Color Range field set is used to target specific colors for adjustment. Enable the Color Range checkbox to enable the associated functionality. | ||
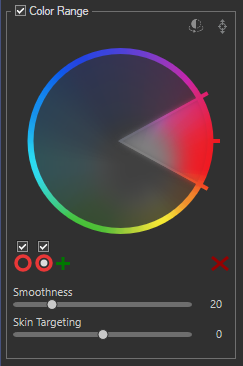
|
Invert Color |
|
Click the icon to invert the selected colors on the wheel. |
| Color Indicator |
|
Click the icon to display and produce an eyedropper for selecting color pixels in the image. Hold down the Alt key and click with the eyedropper to make a color selection. | |
| Color Wheel | Use the Color Wheel to adjust precise colors in an image. The Color Wheel is particularly useful for common requests like making a blue sky more blue, or brightening dark water that is meant to depict a bright lake. The selected color is displayed in the circle below the Enable Wheel checkbox. For more information on the Color Wheel, see Adjusting Color with the Color Wheel. | ||
| Enable Wheel | Located above the Wheel Selection circle displaying the selected color, enable the checkbox to make the associated wheel active. | ||
| Add Wheel | + | Click the icon to make changes to another color using an additional color wheel. | |
| Wheel Selection | Located directly beneath the Enable Wheel checkbox, click the inside circle to select the associated color wheel. The selected color is represented by the wheel. | ||
| Delete Wheel | 
|
Deletes the currently selected color wheel. | |
| Smoothness | Increase the slider to adjust smoothness, which acts like a feathering tool to soften a color's edges. | ||
| Skin Targeting | Using the Skin Targeting slider will disable the rest of the Color Range field set and allow only skin tones to be targeted. | ||
Creating Layer Masks From Images
You can copy color images and paste them as grayscale (luminance) masks on other layers, including adjustment layers.
To Create a Mask from an Image:
- Do one of the following:
- Right-click an image in the Layers pane and choose Copy from the context menu.
- With an image selected in the Layers pane, choose Edit | Copy.
- Select a layer in the Layers pane and do one of the following:
- Right-click the layer and choose Paste as Mask from the context menu.
- Choose Edit | Paste as Mask.
- Choose Layer | Mask | Paste as Mask.