Reducing Noise
The Noise Reduction tool reduces noise in images caused by high ISO settings or long exposure.
Save adjusted settings as a preset for future use.
If ACDSee 15.0 loads an acdc file made with a previous version, the denoise adjustment layer is added using the legacy settings and runs the legacy algorithm. Loading does not change the image. The ACDSee 15.0 GUI is loaded, but only the legacy sliders are enabled (Luminance and Color) and the new sliders disabled. If a legacy slider is moved, the new algorithm is engaged and the new sliders enabled. The image can then be re-adjusted for better results using the additional ACDSee sliders.
ACDSee 15.0 acdc files that include denoise adjustment layers will not load in older versions of ACDSee.
To reduce noise in an image:
- In Develop mode, select the Detail tab.
- In the Noise Reduction group, adjust the sliders as described below.
Noise Reduction Options
|
Reset to default |

|
Resets the group to its default settings. |
|
Adjust develop settings for this group |

|
Opens a develop settings menu for resetting last saved settings, applying a last used setting, presets, and copy and pasting options. |
|
Activate this group |
  |
If changes are made to the image settings, toggle the group icon to see the changes with the blue active icon and the original image with the inactive gray icon. Any changes made to the image settings are preserved for the comparison between original and altered. |
|
Luminance |
Drag the slider to the right to reduce the visibility of lighting noise. Apply a setting that is proportional to the noise in the image and refer to the preview window to ensure that you balance the level of noise reduction with loss of detail. Hold down the Alt key while using the slider to see the remaining noise in the image. |
|
|
Strength |
Drag the slider to the right to control how aggressively to reduce noise. Prevent the loss of detail by balancing Luminance with Strength. |
|
|
Color Noise Reduction |
Drag the slider to the right to remove color noise from the image. Hold down the Alt key while using the slider to see the remaining color noise in the image. |
|
|
Tonal Range |
Tonal Range refers to a range of average brightness values in an image. For example, the tonal range of a photo taken in a dark cavern it would be low, whereas a sunny sky would be high. The Tonal Range slider increases in value from left to right, increasing from a low tonal range on the left to a high tonal range on the right. The Tonal Range slider is used to focus noise reduction to areas of the image that have a corresponding tonal range. For example, the left-most position would reduce the noise in a cavern more than a sky. Tonal Range only affects luminance noise reduction. |
|
|
Frequency Range |
The Frequency Range slider adjusts the noise pattern. High frequency noise looks like fine static while low frequency noise looks like coarse grain or "splotches". Move the Frequency Range slider to the left to limit noise reduction to high frequency noise. Frequency Range affects both luminance and color noise reduction. |
|
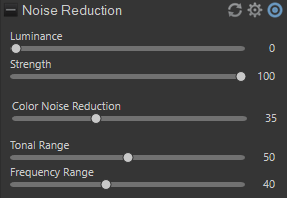
RAW Noise Reduction Defaults
For RAW files only, the slider values in the Noise Deduction tool have default values as shown in the image below.
To save new default values or reset the default values for the Noise Deduction tool, click the settings icon  and select Save New Default or Reset Default from the menu.
View the effects of your changes in the Preview Window, located at the top of the Detail pane. Move the overlay square on your image to change the area the Preview Window displays.
You can right-click a slider to reset to the default value.