Organizing, Adjusting, and Displaying Media
Media can be arranged on Timeline tracks to create and edit a video. Using multiple tracks allows for unlimited layering of content. Drag and drop audio, video, and images from the My Media tab to any track on the Timeline, at any point on the Timeline. It is also possible to drag text, transitions, audio effects, animations, behaviors, filters, overlays, and advanced effects to specific media locations on the Timeline, or on the track above the media. Captions will be added at the Playhead. After media has been added to the Timeline, move media to a desired location by selecting and dragging.
Timeline Tracks
Use the tracks on the Timeline to create a layered hierarchy of content. For instance, if a media asset on Track 1, but then add another media asset on Track 2, the media asset on Track 2 will cover the media asset on Track 1. However, the way in which media appears can be altered by adjusting its opacity and blend mode. Opacity determines the transparency of the media. By altering the opacity of the media asset on Track 2, the media asset on Track 1 can show through. Blend modes determine how layers blend together.
- Select media on the Timeline.
- Click the Properties button in the top right corner.
- Adjust the settings as described below.
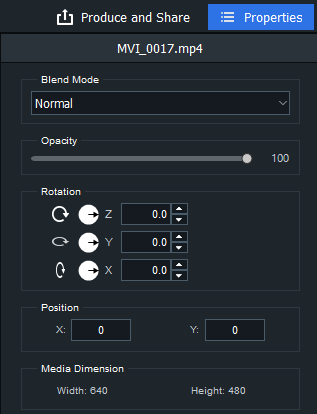
Properties Pane Options
|
Blend Mode |
Use the effects in the Blend Mode drop-down menu to control how media blends with the media or background below it. If the media asset is not stacked on one or more tracks, blend modes will blend the media with the background. By default, the background is black, however, the color of the background can be changed in the Project Settings. For more information, see Display Area below. |
|
Opacity |
Use the Opacity slider to change the media opacity. |
|
Rotation |
To rotate the media asset, enter a value in the field or drag the arrow handles to rotate the media by the X, Y, or Z axes. |
|
Position |
Enter a value in the X and/or Y fields, or drag the clip around in the Display Area to change its position. |
Copying and Pasting Properties
The blend mode, opacity, position, and rotation values of clips on the Timeline can be copied and pasted to other clips on the Timeline.
To copy and paste properties:
- Right-click a clip on the Timeline with blend mode, opacity, position, and rotation values.
- Select Copy Properties from the context menu, or press Ctrl + Alt + C.
- Select another clip on the Timeline.
- Right-click and select Paste Properties, or press Ctrl + Alt + P.
Tracks and their associated media can be locked to prevent editing or other changes by clicking the Lock button. 
To unlock the track, press the Lock button. 
Tracks can be hidden or revealed, and by extension, the media on those tracks, by clicking the Disable button on the track. 
Hiding tracks can be useful for isolating and editing specific parts of a video.
Video productions will not include media on tracks set to "Disabled".
Closing Gaps on the Timeline
Empty spaces between media can be removed on the Timeline by using Close Gaps on Track.
To remove an empty space on a track:
- Right-click an empty area on a track in the Timeline.
- Select Close Gaps on Track from the context menu.
To remove an empty space between multiple media assets:
- Select multiple media assets in a track on the Timeline.
- Right-click one of the selected media assets.
- Select Close Gaps from the context menu.
Playback Quality
The video playback quality can be adjusted to help speed up the editing process. This is useful when working with high quality videos or if the host computer is processing the video slowly.
To change playback quality:
To change playback quality, do one of the following:
- Click the drop down menu beside the seek bar
 and select a quality.
 - Select View | Playback Quality from the menu and make a selection from the list.
Changing the playback quality will not affect the quality of the final output.
Full Screen Playback
Video playback can be viewed in full screen to experience the video in more detail.
To view playback in full screen:
To view the video playback in full screen, do one of the following:
- Select View | Display Area from the menu and select Full Screen/Restore.
- Press F.
- Click the Full Screen button.

Display Area
The Display Area previews how a video will look once rendered. Content can be moved around and resized within the Display Area. Resize by dragging the handles on the edges of the media. To resize while maintaining the aspect ratio, use one of the corner handles. To create an abnormal aspect ratio, hold down Shift while dragging the corner handles.
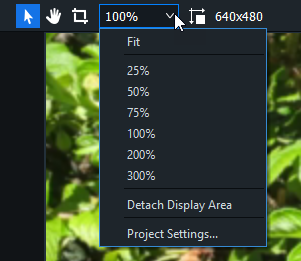
Zoom the Display Area to accommodate monitor size by using the percentages in the drop-down menu at the top of the Display Area. Select Fit to allow Luxea to adapt automatically. Detach the Display Area to make editing easier. Detaching is useful when editing across two screens, or for viewing edits in full screen.
To detach the Display Area, do one of the following:
- Select View | Display Area from the menu and click Detach Display Area.
- Select Detach Display Area from the drop-down menu at the top of the Display Area.
- Above the Timeline Toolbar, click the Detach Display Area button.

To reattach the Display Area:
To reattach the Display Area, do one of the following:
- Click the drop-down menu at the top of the Display Area and select Reattach Display Area.
- In the Display Area, click the Reattach Display Area button.
- Close the detached display area.
To configure the Display Area settings:
To configure the Display Area settings for a project and resulting video production, do one of the following:
- Click the Project Settings button at the top of the Display Area.

- Click the drop-down menu at the top of the Display Area and select Project Settings.
Configure the settings as described below and click Apply the apply button.

Change the size settings for a rendered video in the Settings dialog in the Production Assistant.
Project Settings
|
Display Area Dimensions |
Select dimensions for the Display Area from the drop-down menu, or select Custom to specify a unique width and height. Select preset dimensions for social media channels TikTok and Instagram. |
|
Width/Height |
Resizes the Display Area when Custom is selected from the Display Area Dimensions drop-down menu. |
|
Color |
Customize the Display Area background color by selecting a color from the drop-down menu. |
|
Choose a Frame Rate for a video from 23.97 frames per second (fps) to 60 fps. |

|
Pan tool: use the Pan tool to move the Display Area without resizing it. |
Press Ctrl + Shift + P. |

|
Edit tool: use the Edit tool to move and resize media within the Display Area. |
Press Ctrl + Shift + E. |

|
Crop tool: use the Crop tool to remove unwanted parts of the media. Drag the handles of the crop window to your desired size. To maintain the media's aspect ratio, resize the crop window by dragging the corners. Move the crop window around. To restore cropped material, re-enter the Crop tool and resize the crop window as desired. |
Press Ctrl + Shift + C. |