Adjusting Color With Color EQ
Color EQ lets you make color adjustments for saturation, brightness, hue, and contrast. You can make adjustments to the entire image in Standard mode using the vertical slider, or adjust on a color by color basis in Standard or High Quality mode. For explanation on the controls, see below.
You can save your settings as a preset for future use.
To Adjust Color:
- In Develop mode, select the Tune tab.
- In the Color EQ group, select the Saturation, Brightness, Hue, or Contrast tab, and adjust them according to the options described in the table below.
You can right-click a slider to reset to the default value.
Color EQ Options
|
Select High Quality mode or Standard mode from the Color EQ drop-down menu. To adjust colors individually, left-click a color in the image and drag up or down to alter. Your changes are reflected in the color sliders in High Quality mode, and the graph in Standard mode respectively. This works in the Saturation, Brightness, Hue, and Contrast tabs. |
||
|
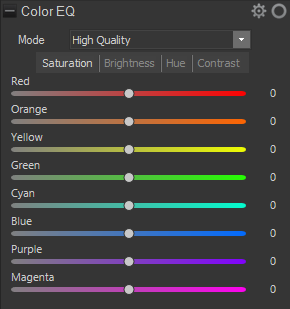
High Quality |
||
|
Adjust image colors individually. High Quality uses the newer, more modern color models, allowing for a visually perceptive and higher quality adjustment. |
||
|
Adjust each color individually by dragging sliders right for more intensity, or left for less intensity. You can also enter a number into the fields for precise adjustments. Or, select a precise color to adjust by placing your cursor on the image for the double arrow icon to appear. Then, click and drag up or down to adjust the colors beneath the double arrow icon. The affected color sliders automatically adjust as you move your cursor. |
|
|
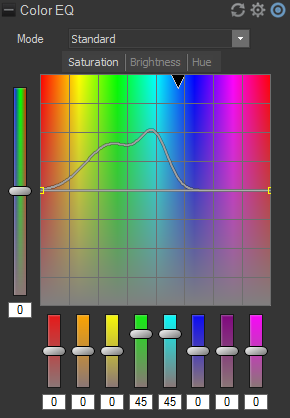
Standard |
||
|
Supports previously developed images. Adjust colors individually or make global adjustments. |
||
|
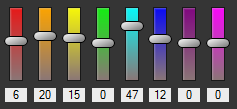
Vertical slider
|
Apply adjustments to the entire image. A slider on the left has the following effects on the tabs:
You can also enter a number into the field for precise adjustments. |
|
|
Individual color sliders
|
Adjust each color with individual sliders. Select the color you want to adjust and click and drag the sliders. You can also enter a number into the fields for precise adjustments. |
|
|
Direct image adjustments
|
Place your cursor on the image for the double arrow icon to appear. Then click and drag up or down to adjust the colors beneath the double arrow icon. The curve control and the affected color sliders automatically adjust as you move your cursor. The black down arrow on the graph indicates the color you are adjusting in the image. The curve appears black in the graph, and you cannot directly adjust it. To apply further adjustments, you can alter the white curve. When you adjust the white curve, the black curve automatically changes with it. You can also enter a number into the fields for precise adjustments. |
|
|
Black & White Mode |
||
|
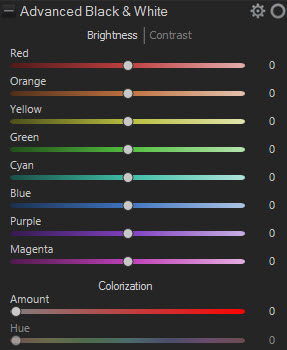
Advanced Black & White
|
In Black & White mode, (as defined in the General group of the Tune tab), the Color EQ group becomes the Advanced Black & White group. Brightness tab:
Contrast tab:
Colorization: adds color back into the image based upon the color you select with the Hue slider. The saturation of the color added back to any given pixel is scaled based on both the amount of color/saturation that existed in the original image and the Amount slider. |
|