Layer Effects
Layer effects added to either regular images or text layers appear between layers. Layer effects cannot be added to any adjustment layer, regardless of the layer type. Saving a images with layer effects as .gsd files allows the images to remain editable for future work using Gemstone.
To add layer effects:
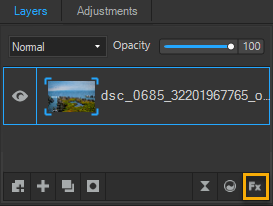
- In the Layers pane, select the layer to add effects.
- Do one of the following:
- At the bottom of the Layers pane, click the Layer Effects button.

- In the Layers pane, right-click the layer and select Layer Effects... from the context menu.
- Select Layer | Layer Effects... from the main menu.
- Press Ctrl + Alt + X.
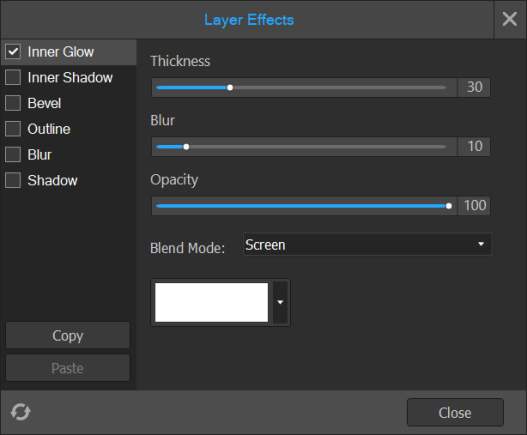
- In the Layer Effects dialog, enable the checkboxes of desired effects. Configure the settings as described below.
- Click the Close button. Closing the Layer Effects dialog does not remove or disable layer effects. By saving a layered image as an .gsd file, the image can be re-opened in Gemstone for future work.
Layer Effects Options
| Inner Glow | |
|
Thickness |
Specifies the thickness of the glow effect. Drag the slider to set the thickness. |
|
Blur |
Blurs the edges of the glow. Drag the slider to determine how much blur is applied. |
|
Opacity |
Specifies the opacity of the glow. Type a number from 1 to 99 or drag the slider to adjust the opacity of the glow. The higher the opacity, the more visible the glow is. |
|
Blend Mode |
Specifies how the effect blends with the layer. Select a blend mode from the drop-down menu. |
|
Color |
Specifies the color of the glow. Click the color picker to select a different color. See Using the Color Dialog Box. |
| Inner Shadow | |
|
Blur |
Blurs the edges of the shadow. Drag the slider to determine how much blur is applied. |
|
Distance |
Specifies the size of the shadow according to the angle setting. Drag the slider to adjust how far the shadow encroaches on the layer. |
|
Opacity |
Specifies the opacity of the shadow. Type a number from 1 to 99 or drag the slider to adjust the opacity of the shadow. The higher the opacity, the more visible the shadow is. |
|
Blend Mode |
Specifies how the effect blends with the layer. Select a blend mode from the drop-down menu. |
|
Angle |
Specifies the angle of the shadow. Type a number from 1 to 360 or drag the arrow to adjust the angle. |
|
Color |
Specifies the color of the shadow. Click the color picker to select a different color. See Using the Color Dialog Box. |
| Bevel | |
|
Elevation |
Specifies the visibility of the bevel effect. As the Elevation slider is reduced, the layer darkens, making the effect stand out more. |
|
Radius |
Specifies how spread out the bevel is. |
|
Light Source |
Specifies an imaginary light source. Click and drag the glow on the ball to reposition the imaginary light source. |
| Outline | |
|
Thickness |
Specifies the thickness of the outline effect. Drag the slider to set the thickness. |
|
Blur |
Blurs the edges of the outline. Drag the slider to determine how much blur is applied. |
|
Opacity |
Specifies the opacity of the outline. Type a number from 1 to 99 or drag the slider to adjust the opacity of the outline. The higher the opacity, the more visible the outline is. |
|
Color |
Specifies the color of the outline. Click the color picker to select a different color. See Using the Color Dialog Box. |
| Blur | |
|
Strength |
Specifies the strength of the blur. Move the slider to the right to intensify the effect. |
| Shadow | |
|
Blur |
Blurs the edges of the shadow. Drag the slider to determine how much blur is applied. |
|
Distance |
Specifies the size of the shadow according to the angle setting. Drag the slider to adjust how far the shadow encroaches on the layer. |
|
Opacity |
Specifies the opacity of the shadow. Type a number from 1 to 99 or drag the slider to adjust the opacity of the shadow. The higher the opacity, the more visible the shadow is. |
|
Angle |
Specifies the angle of the shadow. Type a number from 1 to 360 or drag the arrow to adjust the angle. |
|
Color |
Specifies the color of the shadow. Click the color picker to select a different color. See Using the Color Dialog Box. |
When clipping an Adjustment Layer to a text or image layer with layer effects applied to it, the layer effects will not be affected.
To continue to edit an image's Layer Effects at a future date, when rasterizing a text layer with layer effects applied, do not rasterize its layer effects.
To copy and paste layer effects:
- Configure the desired layer effects settings in the Layer Effects dialog.
- Click the Copy button.
- Select another image or text layer. (The bottom layer cannot be selected.)
- In the Layer Effects dialog, click the Paste button.
To reset all layer effects settings:
In the Layer Effects dialog, click the Reset button. 