Applying Filters
Use Filters to alter the look of Media Assets.
To add filters to Media assets:
There are three ways to add Filters to Media on the Timeline:
- With clips added to the Timeline, select the Filters panel.
- Select a Filter and drag it over a clip on the Timeline.
- Right-click the Filter and select Apply.
- Press Alt + A.

To adjust the settings of a filter:
Configure the filters properties and set special options:
- Select the clip on the Timeline with the filter applied and click the bar at the bottom of the clip.
- By selecting the filter effect on a clip on the Timeline, its properties are loaded into the Properties panel. Here you can adjust elements unique to each filter.
To copy and paste a filter from one media asset to another:
- Select any Media Asset that has the filter settings you would like to copy then right-click and select Copy, or press Ctrl + C.
- On the destination Media Asset, right-click and select Paste Properties.
- From the Paste Properties window that appears, ensure that the Filter option is selected.
You may deselect any other Paste Properties you do not desire to bring over with the Filter.
Filter Settings
Filters can have their properties adjusted like any other Media asset.
To adjust filter settings:
There are two ways to adjust the settings for Filters on Media assets.
Adjusting All Filters:
Clicking on a Media Asset will display its Properties, as well as the properties of all Filters assigned to it.
- With Media on the Timeline that has a Filter assigned to it, click on the Media Asset itself
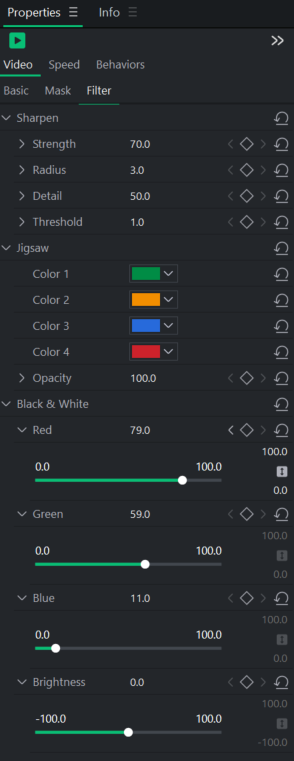
- In the Properties panel, click on the Filters tab. This will display the settings for all Filters associated with the Media Asset.
Adjusting a Specific Filter:
- With Media on the Timeline that has one or more Filters assigned to it, click on the yellow bar on the Media clip
 .
. - Select the Filter to adjust the Properties for.
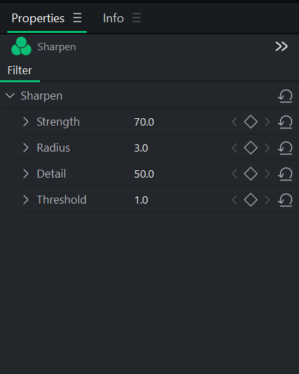
- The Properties panel will now display only that Filter's settings.
Filter Settings Options
|
Black & White |
Adjust the Red, Green, or Blue sliders to add color back into a black and white media asset |
|
Brightness |
Adjusts the brightness of the colors of a media asset. |
|
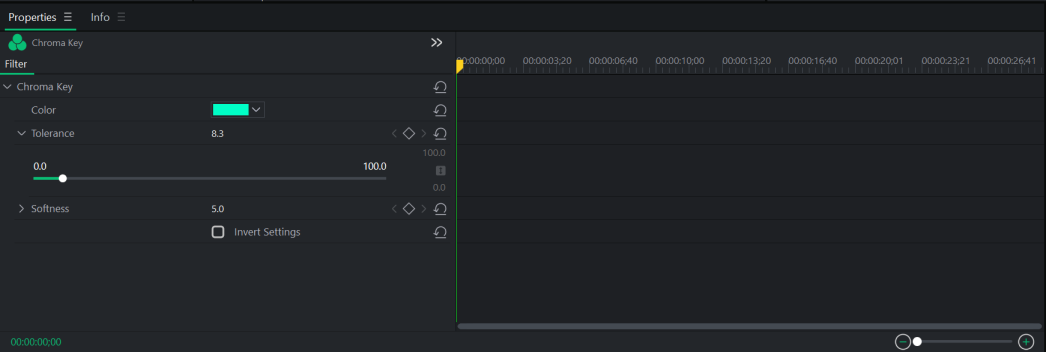
Chroma Key |
|
|
Color |
Use the color selector to choose the color to be used. |
|
Tolerance |
Set the strength of the tolerance of the filter. |
|
Softness |
Set the strength of the softness of the filter. |
|
Invert Settings |
Inverts the currently defined settings. |
|
Chromatic Aberration |
|
|
Degree |
Drag the slider to adjust the amount the colors shift when playing a project. |
|
Color Fence |
|
|
Degree |
Drag the slider to change the number and relative width of color bars to appear on the media asset. |
|
Color LUTs |
|
|
Input LUT |
Select a color from the dropdown list to set the look up table reference. |
|
Opacity |
Set the strength of the opacity value between 0 and 100. |
|
Color Pass |
|
|
Color |
Select a color from the dropdown list. |
|
Similarity |
Adjust the slider to define how similar a color must be to the selected color in order to be affected. |
|
Invert Settings |
Enable the Invert Settings checkbox to remove a selected color and leave every other color. |
|
Directional Blur |
|
|
Strength |
Specifies the strength of the blur. Move the slider to the right to intensify the effect. |
|
Angle |
Specifies the direction of the blur effect. |
|
Directional Blur Background |
|
|
Strength |
Specifies the strength of the blur. Move the slider to the right to intensify the effect. |
|
Angle |
Specifies the direction of the blur effect. |
|
Emboss |
|
|
Elevation |
Specifies the light source's elevation on the media asset. Lower values produce more shadows and a darker media asset. Higher values produce fewer shadows and a lighter media asset. |
|
Azimuth |
Specifies the amount of relief added to the media asset. Higher values increase the relief depth. |
|
Weight |
Specifies the angle of shadows that extend from the edges of the media asset details. A value of 0 adds shadows to the left side, while a value of 180 adds shadows to the right side. |
|
Exposure |
|
|
Exposure |
Adjusts the brightness of the colors of a media asset. |
| Contrast | Drag the slider to the right to increase contrast, or drag to the left to decrease contrast. |
|
Four Seasons |
|
|
Horizontal / Vertical |
Choose an orientation for the color bars on the media asset. |
|
Gaussian Blur |
|
|
Strength |
Specifies the strength of the blur. Move the slider to the right to intensify the effect. |
|
Gaussian Blur Background |
|
|
Strength |
Specifies the strength of the blur. Move the slider to the right to intensify the effect. |
|
Hue Shift |
|
|
Hue |
Drag the slider to change the hues of the colors in a media asset. |
|
Jigsaw |
|
|
Color 1, Color 2, Color 3, Color 4 |
Use the Colors pop-up to select precise colors for each portion of a media asset's changed hues. The far right vertical color slider is used to navigate to a color group. A selected color displays its numerical values in the Red, Green, and Blue fields, as well as the Hex field. Enter precise values to get specific colors or use the Color Dropper tool to pick specific colors for the media asset. |
|
Opacity |
Use the Opacity slider to change the opacity of the Jigsaw effect. |
|
Light EQTM |
|
|
Brighten |
Drag the slider to the right to increase the brightness of dark areas of a media asset. |
|
Darken |
Drag the slider to the right to decrease the brightness of light areas of a media asset. |
|
Linear Gradient |
|
|
Start Color |
Use the Colors pop-up to select the precise color for the Linear Gradient filter to start with. On the far right is a vertical color slider, navigate to a color group. A selected color display its numerical values in the Red, Green, and Blue fields, as well as the Hex field. Enter precise values to get specific colors or use the Color Dropper tool to pick specific colors for the media asset. |
|
End Color |
As above, use the Colors pop-up to choose the color to end the gradient with. |
|
Horizontal Vertical |
Choose an orientation for the Start Color and End Color. |
|
Mirror |
|
|
Horizontal / Vertical |
Choose an orientation for the mirror's axis. |
|
Axis |
Drag the slider to adjust the position of the mirror's axis. |
|
Morphology |
|
|
Width |
Specifies the width of each bar. |
|
Height |
Specifies the height of each bar. |
|
Pane |
|
|
Width |
Specifies the width of the color bar that moves across the video. |
|
Partial Mosaics |
|
|
Width |
As you increase the Width, the blocks will fill in from the left and right. |
|
Height |
As you increase the Height, the blocks will fill in from the top and bottom. |
|
Degree |
Drag the slider to adjust the size of the blocks. |
|
Photo Effect |
Select a photo effect from the drop-down menu to change the look and feel of a Media Asset. |
|
Reflection |
|
|
Height |
Drag the slider to set the height of the reflection. |
|
Replace Color |
|
|
Target Color: |
Use the Colors pop-up to select precise colors to replace. The far right vertical color slider navigates to a color group. The selected color displays its numerical values in the Red, Green, and Blue fields, as well as the Hex field. Enter precise values to get specific colors, or use the Color Dropper tool to pick specific colors for your media. |
|
Replace Color: |
As above, choose a color to replace a target color with. |
|
Similarity: |
Adjust the slider to define how similar a color must be to the selected color in order to be affected. |
|
Solid Colors: |
Select to set the colors to solid only. |
|
RGB |
Adjust the Red, Green, or Blue sliders to balance or heighten the RGB channels of a media asset. |
|
Shake |
|
|
Degree |
Specifies the strength of the pulse. |
|
Sharpen |
|
|
Strength |
Specifies the strength of the sharpening applied by increasing contrast around edges. |
|
Radius |
Controls the number of pixels to adjust around each edge. Higher values increase the number of sharpened pixels and tend to bring out coarser detail, while lower values reduce the number of sharpened pixels and tend to bring out finer detail. |
|
Detail |
Suppresses the halo, (the light border that forms around edges with extreme sharpening), by reducing its intensity. The higher the value, the stronger the reduction. |
|
Threshold |
Specifies how different the pixel lightness values within an edge must be before the pixels within the edge are sharpened. Higher values sharpen only stronger edges but minimize the appearance of noise. Lower values sharpen both strong and weaker edges, but can increase the appearance of noise. We recommend you set the threshold to enhance edges while keeping background noise to a minimum. |
|
TV Wall |
|
|
Number of TVs |
From the drop-down menu, select the number of "TVs" to display. |
|
Vertical Divide |
|
|
Divisions |
From the drop-down menu, select the number of times to divide a media asset. |
|
Vibrance |
|
|
Vibrance |
Drag the slider to the right to increase vibrance, or to the left to decrease vibrance. Increasing vibrance does not affect skin tone of a media asset. |
|
Saturation |
Drag the slider to the right to increase saturation, or to the left to decrease saturation. |
|
Hue |
Adjusts the hue of the image or video. Drag the slider to the right to increase or drag to the left to decrease hue. |
|
Lightness |
Adjusts the image or video brightness. Drag the slider to the right to increase or drag to the left to decrease the media asset's brightness. |
|
Vignette |
|
|
Strength |
Specifies the size and intensity of the vignette. |
|
Distance |
Specifies the size of the clear area around the focal point in the portrait. Drag the slider to the left to reduce the size of the clear area. Drag the slider to the right to increase the size of the clear area. |
|
Shape |
Specifies the shape of the frame. |
|
White Balance |
|
|
Temperature |
Adjusts the warmth of the correction, from blue to yellow. |
|
Tint |
Adjusts the tint of the correction, from green to magenta. |
The Chroma key, Color LUTs, Replace Color, Color Pass, and Mosaic filters are also available from the Advanced button on the Timeline toolbar. For more see Advanced Effects.