You are here: Correcting Flaws with Photo Editor > Correcting Problems with Color > Adjusting Saturation in Specific Areas of a Photo

Adjusting Saturation in Specific Areas of a Photo

The Hue/Saturation and Color Equalization functions adjust saturation throughout a photo. You can also adjust the saturation in a specific area of the photo with the Sponge Tool.

To Adjust Saturation in a Specific Area of a Photo:
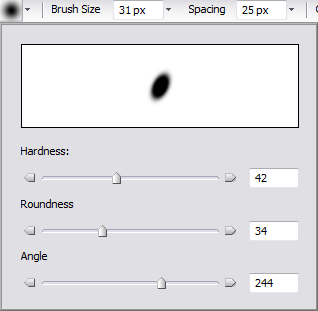
  1. From the Toolbar, select the Magnifying Glass Tool and click to zoom in on the flaw.
  2. In the Fix section of the Toolbar, select the Sponge Tool from the Tool drop-down menu.
  3. In the Properties bar, set the options as described below.
  4. Click and drag across the image.
  5. Click Done in the Properties bar.

Sponge Tool Options

Brush Options

Select brush options:

  • In the Properties bar, click the Brush Options icon.
  • Drag the Hardness slider to the left to soften the brush or nib and to the right to harden.
  • Drag the Roundness slider to the left to flatten the brush or nib and to the right to make the brush or nib round.
  • If you flattened the brush or nib, you can drag the Angle slider to the left and right to change the angle.

Brush Size


Click the drop-down arrow beside the Brush Size box and drag the slider to the left or right until the brush or nib is the desired size.

Spacing


Click the arrow beside the Spacing box and drag the slider to the left to create a smooth, continuous stroke and to the right to create a dotted stroke.

Pressure


Click the arrow beside the Pressure box and drag the slider to the left to reduce pressure and to the right to increase pressure. Changing pressure changes the amount of smudging.

Mode


From the Mode drop-down select a blend mode:

  • Saturate
  • Desaturate

Fade


From the Fade drop-down, select fade options:

  • Select Size to create the impression that a stroke is shrinking, as if you are slowly lifting the brush or nib off the work area.
  • Select Pressure to create the impression that a stroke is fading, as if the brush or nib is slowly running out of ink.
  • Select Size and Pressure to create the impression that a stroke is shrinking and fading.

See Also: