or the Burn Tool
 from the drop-down menu .
In a traditional darkroom, photos are created by shining light through film onto light-sensitive paper for a period of time. That period of time determines the lightness and darkness of the photo. If the paper is exposed to light for a shorter period of time, the photo is lighter. If the paper is exposed to light for a longer period of time, the photo is darker.
However, some parts of a photo may be much darker or much lighter than other areas of the photo. Photographers in a traditional darkroom could lighten and darken these areas by reducing or increasing the time that the areas were exposed to light. They did this by moving their hands or another object above the light-sensitive paper, effectively blocking light to some areas of the photo (dodging), while allowing light to other areas of the photo (burning).
You can do the same thing with digital photographs. You can use the Dodge Tool to lighten dark areas of a photo and the Burn Tool to brighten dark areas of a photo.
To Dodge and Burn a Photo:
or the Burn Tool from the drop-down menu .Dodge and Burn Options
|
Brush Options |
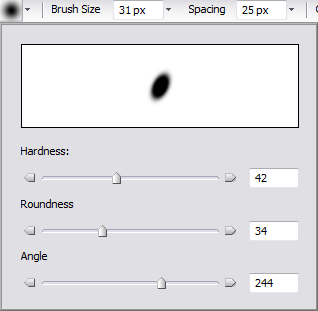
Select brush options:
|
|
Brush Size |
Click the drop-down arrow beside the Brush Size box and drag the slider to the left or right until the brush or nib is the desired size. |
|
Spacing |
Click the drop-down arrow beside the Spacing box and drag the slider to the left to create a smooth, continuous stroke and to the right to create a dotted stroke. |
|
Exposure |
Click the arrow beside the Exposure box and drag the slider to the left to reduce the amount of light that is blocked and to the right to increase the amount of light that is blocked |
|
Mode |
From the Mode drop-down, select Shadows, Midtones, or Highlights.
|
|
Fade |
Select fade options:
|