Using AI Image Generation
AI Image Generation creates a new image from a written description. Unlike the other generative tools, it doesn't change an existing image.
Where the generated image goes depends on how you open AI Image Generation. From Manage mode or View mode, it's saved as a file.
AI Image Generation sends your request to a cloud service, so it requires an internet connection, a signed-in ACDSee account, and available credits. Credits are used each time you click Generate.
For more information, see About Generative AI in ACDSee Ultimate.
Ways to Generate an Image
AI Image Generation is available in Manage mode, View mode, and Edit mode.
| Open it from | Result |
| AI | AI Image Generation... in Manage mode or View mode | Saves the generated image to the folder you choose under Output. |
| File | AI Image Generation... in Edit mode | Saves the generated image to the folder you choose under Output, then opens it in Edit mode. |
| Generate an image as a layer, in the Adjustment Layers menu in Edit mode | Adds the generated image to your current image as a new layer. No file is saved. This is the only difference in the dialog box: the Output section isn't present. |
To Open AI Image Generation in Manage Mode or View Mode:
Do one of the following:
- Click AI | AI Image Generation....
- Press Shift + Alt + G.
To Open AI Image Generation in Edit Mode:
Click File | AI Image Generation....
Before the generated image opens, ACDSee Photo Studio Ultimate 2027 prompts you to save any unsaved changes to the image you're working on. The current image then closes, and the generated image opens in Edit mode.
To Open AI Image Generation for a New Layer:
Click Generate an image as a layer in the Adjustment Layers menu.
The generated image is added to your current image as a new layer. It isn't saved as a file, and the dialog box doesn't include the Output section described below.
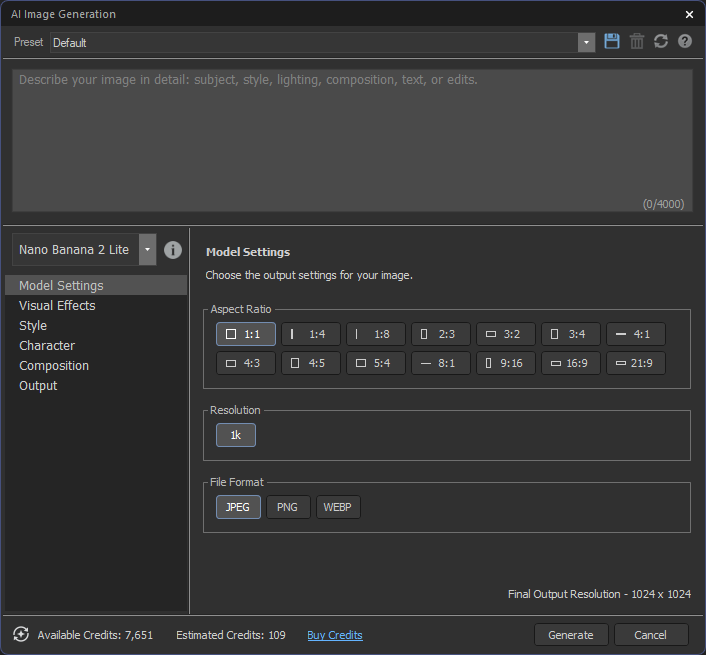
Settings
Presets and Reset
| Control | Description |
| Presets | Loads a saved combination of settings. Click the Save icon to store the current settings as a preset, or click the Delete icon to remove the selected preset. |
| Reset | Returns every setting in the dialog box to its default. |
Prompt
| Setting | Description |
| Prompt | Accepts a description of the image you want, up to 2,000 characters. At the limit, the field turns red and stops accepting input. |
Model
| Setting | Description |
| Model | Selects the model used to generate the image. Options are Nano Banana 2 Lite, Nano Banana 2, Nano Banana Pro, and Nano Banana. Your choice determines the aspect ratios and resolutions available under Model Settings and affects the number of credits a generation costs. |
Model Settings
The options under Model Settings change with the model you select.
| Partner | Model | Description | Aspect Ratio | Resolution | Reference Images |
| Gemini | Nano Banana 2 Lite | Fastest: Prioritizes speed, making it ideal for concepts, drafts, and rapid iteration. | 1:1, 1:4, 1:8, 2:3, 3:2, 3:4, 4:1, 4:3, 4:5, 5:4, 8:1, 9:16, 16:9, 21:9 | 1k | 14 |
| Nano Banana 2 | Recommended: Delivers excellent image quality, strong prompt accuracy, and reliable results for most image generation tasks. | 1:1, 1:4, 1:8, 2:3, 3:2, 3:4, 4:1, 4:3, 4:5, 5:4, 8:1, 9:16, 16:9, 21:9 | 0.5k, 1k, 2k, 4k | 14 | |
| Nano Banana Pro | Most Capable: Provides the highest level of quality and control for complex prompts and professional results. | 1:1, 2:3, 3:2, 3:4, 4:3, 4:5, 5:4, 9:16, 16:9, 21:9 | 1k, 2k, 4k | 14 | |
| Nano Banana | Balanced: Offers dependable performance for everyday image generation. | 1:1, 2:3, 3:2, 3:4, 4:3, 4:5, 5:4, 9:16, 16:9, 21:9 | 1k | 3 |
Model Settings appear only in AI Image Generation. Generative Edit and AI Generative Fill let you select a model but have no equivalent settings.
Visual Effects
Applies a visual style to the generated image. You can select up to five effects.
Style, Character, and Composition
Each of these three categories accepts reference images that guide the result.
| Category | Description |
| Style | Displays the Style Reference option, where you can upload images that guide the visual style of the result. |
| Character | Displays the Character Reference option, where you can upload images that guide the appearance of characters in the result. |
| Composition | Displays the Composition Reference option, where you can upload images that guide the arrangement of the result. |
The number of reference images you can upload depends on the model you select—14 for most models, but only 3 for the original Nano Banana model. The limit is shared across all three categories, so an indicator reading 6/14 means six images have been uploaded overall, not six in that category.
Output
This section isn't available when you use Generate an image as a layer.
| Setting | Description |
| Current folder | Saves the generated image to the folder you're currently browsing. |
| Specific folder | Saves the generated image to a folder you choose. Type the location, or click the folder icon to browse for it. |
| Create subfolder | Creates a subfolder inside the specified folder and saves the generated image there. Type a name for the subfolder. Available when Specific folder is selected. |
Credits
The bottom of the dialog box shows your available credits and the estimated cost of the current generation.
| Control | Description |
| Refresh available credits | Updates the credit count. |
| Available Credits | Shows the credits currently in your account. |
| Estimated Credits | Shows what the current generation will cost. |
| Buy Credits | Opens the page where you can purchase more credits. |
Your available credit count doesn't update automatically after you purchase more. Click Refresh available credits to update it without restarting ACDSee Ultimate.
Generating an Image
To Generate an Image:
- Open AI Image Generation.
- In the Prompt field, type a description of the image you want.
- Select a model from the Model drop-down list.
- Optional: Under Model Settings, select an aspect ratio, resolution, and file format.
- Optional: Under Visual Effects, select up to five effects.
- Optional: Under Style, Character, or Composition, upload reference images.
- If the Output section is available, select Current folder or Specific folder. If you select Specific folder, type or browse to the location, and optionally select Create subfolder and type a name.
- Click Generate.
Progress appears in the Activity Manager under Queued Activities as Image Generation. Unlike other queued activities, a generation can't be paused or canceled once it has started. For more information, see Using the Activity Manager.
When the generation finishes, a notification appears in the bottom-right corner of the screen. Click Browse to open the folder containing the generated image.
Generating again with the same settings produces a different image. Your prompt and settings stay in place, so you can click Generate repeatedly. Each generation uses credits.