Using Generative Edit and AI Generative Fill
Generative Edit and AI Generative Fill both create new image content from a written description. You type a prompt describing what you want, optionally add reference images, and ACDSee Photo Studio Ultimate 2027 generates a result.
Both tools send your request to a cloud service, so they require an internet connection, a signed-in ACDSee account, and available credits. Credits are used each time you click Generate.
For more information, see About Generative AI in ACDSee Ultimate.
Choosing Between Generative Edit and AI Generative Fill
Both tools share the same prompt, model, and reference controls.
| Generative Edit | AI Generative Fill | |
| Reads | The selected layer only | All layers |
| Produces | A new layer, or new contents for the selected layer | A new layer |
| Saved settings | Presets available | No presets |
| Committing | Click Generate as many times as you need, then commit or discard the result | Applies as soon as generation finishes |
In Generative Edit, you can generate more than once and undo or redo between attempts, then either commit or discard the whole session. AI Generative Fill applies its result as soon as it finishes generating.
Opening Generative Edit and AI Generative Fill
To Open AI Generative Edit in Manage Mode:
Do one of the following:
- Click AI | AI Generative Edit.
- Right-click one or more images and choose AI Features | AI Generative Edit....
- Press Shift + Alt + E.
In Manage mode, the tool is named AI Generative Edit and opens in a dialog box. The prompt, model, and reference settings are the same as in Edit mode.
To Open Generative Edit in Edit Mode:
Do one of the following:
- Click Generative Edit in the AI filter group.
- Click Filter | AI | Generative Edit.
- Press Shift + Alt + G.
To Open AI Generative Fill in Manage Mode:
Do one of the following:
- Click Panes | AI Generative Fill.
- Press Ctrl + F11.
To Open AI Generative Fill in Edit Mode:
Do one of the following:
- Click Panes | AI Generative Fill.
- Press Ctrl + F11.
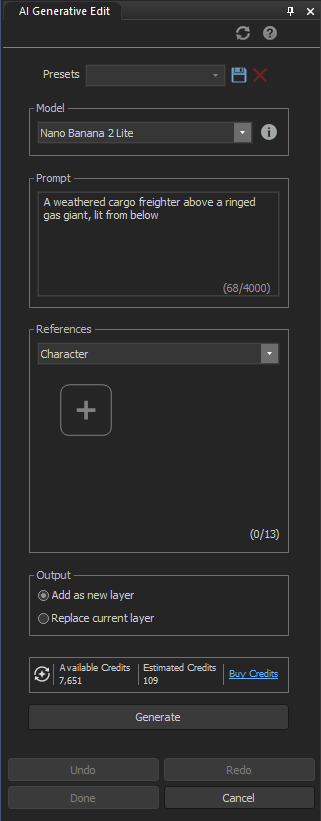
Generative Edit and AI Generative Fill Settings
Model, Prompt, and References
| Setting | Description |
| Model | Selects the model used to generate the result. Options are Nano Banana 2 Lite, Nano Banana 2, Nano Banana Pro, and Nano Banana. |
| Prompt | Accepts a description of the result you want, up to 2,000 characters. At the limit, the field turns red and stops accepting input. |
| References | Selects the kind of guidance a reference image provides. Options are Style, Character, and Composition. Each option has its own section for uploading images. You can upload 14 reference images in total across all three, or 3 if you select the original Nano Banana model. |
Reset
| Control | Description |
| Reset | Returns every setting to its default. |
Reset appears in a different place in each tool: above Presets in Generative Edit, and beside Generate at the bottom in AI Generative Fill.
Presets—Generative Edit Only
| Control | Description |
| Presets | Loads a saved combination of settings. Click the Save icon to store the current settings as a preset, or click the Delete icon to remove the selected preset. |
Output—Generative Edit, in Edit Mode Only
| Setting | Description |
| Add as new layer | Places the generated result on a new layer above the selected layer. |
| Replace current layer | Replaces the contents of the selected layer with the generated result. |
Credits
Each tool shows your available credits and the estimated cost of the current generation at the bottom.
| Control | Description |
| Refresh available credits | Updates the credit count. |
| Available Credits | Shows the credits currently in your account. |
| Estimated Credits | Shows what the current generation will cost. |
| Buy Credits | Opens the page where you can purchase more credits. |
Your available credit count doesn't update automatically after you purchase more. Click Refresh available credits to update it without restarting ACDSee Ultimate.
Generating a Result
To Apply a Generative Edit in Manage Mode:
- Select an image and open AI Generative Edit.
- Select a model from the Model drop-down list.
- In the Prompt field, type a description of the result you want.
- Optional: Select a reference type from the References drop-down list and upload reference images.
- Click Generate. To make further changes, adjust the prompt if needed and click Generate again. Each generation builds on the current result.
- Optional: Click Save to save the edit without closing the dialog box, or click Save As... to save it as a new file.
- Click Done. If you haven't saved your changes, the Save Changes dialog box opens. Do one of the following:
- Click Save or Save As... to save your changes.
- Click Discard to close without saving.
- Click Cancel to return to AI Generative Edit.
To Apply a Generative Edit in Edit Mode:
- Open Generative Edit.
- Select a model from the Model drop-down list.
- In the Prompt field, type a description of the result you want.
- Optional: Select a reference type from the References drop-down list and upload reference images.
- Optional: Under Output, select Add as new layer or Replace current layer.
- Click Generate. To make further changes, adjust the prompt if needed and click Generate again. Each generation builds on the current result.
- Do one of the following:
- Click Done to commit the result.
- Click Cancel to discard the result and close the pane.
To Apply an AI Generative Fill:
- Open AI Generative Fill.
- Select a model from the Model drop-down list.
- In the Prompt field, type a description of the result you want.
- Optional: Select a reference type from the References drop-down list and upload reference images.
- Click Generate. The result is applied when generation finishes.
In AI Generative Fill, to clear the prompt and settings without generating, click Reset beside Generate at the bottom of the pane.
You can use the selection tools to define where the result is applied. Generative Edit and AI Generative Fill work within your selection, though the result sometimes extends beyond it.
When Another Tool Is a Better Fit
Some edits have a dedicated tool that gives a better result than a prompt:
- To replace a sky, use Sky Replacement. For more information, see Sky Replacement.
- To adjust a face, use AI Face Edit. For more information, see Using AI Face Edit.
- To remove an object, use AI Remove. For more information, see Using AI Remove.
Before You Commit
Credits are used when you click Generate, not when you click Done. This has
- Discarding your changes loses everything you generated that you haven't saved, and the credits are not returned. To discard, click Cancel in Edit mode, or click Discard in the Save Changes dialog box in Manage mode.
- Clicking Generate after undoing a result replaces what Redo was holding. You can't return to the earlier result.
- If Replace current layer is selected, clicking Done permanently replaces the contents of the selected layer. This cannot be undone once the tool closes. To keep the original, select Add as new layer instead.
If you generate a result you want to keep, commit it before experimenting further.