Stacking Files
Stacking condenses multiple files in the File List pane into one, with a single image, the head of the stack, representing all of the stacked files. Stacks are useful for bracketed exposures, burst sequences, or any set of files you want to keep together without them filling your view.
Stacks exist only in ACDSee Photo Studio Ultimate 2027. Nothing is written to your files, and stacking doesn't move, rename, or alter them.
Stacks appear in Manage, View,
How Stacks Appear
A collapsed stack shows a stack icon with a count of the files inside it, and a light blue bar down each side of the head of the stack.
When you expand a stack, the icon is replaced by a position indicator on each file—1/5, 2/5, and so on. The light blue bars move to the outer edges of the first and last files, showing the extent of the stack.
| Collapsed | Expanded |
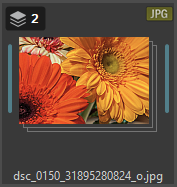
|
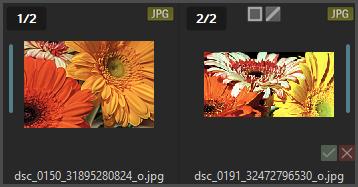
|
What You Can and Can't Do with a Stack
A collapsed stack behaves as a single file. Selecting two collapsed stacks reports two files selected, and a batch operation applied to them affects only the head of each stack. Expand a stack first to work with every file in it.
A stack can contain only files from the same folder. If you select files from more than one folder, ACDSee Ultimate displays an error message.
Multi-folder view shows files from several folders at once. You can still create stacks there, but all the files you select must come from the same folder. Drag-and-drop stacking is not available in multi-folder view, but the Stack menu commands, such as Move Up in Stack and Move Down in Stack, still work.
A stack can't contain another stack, archive files such as .zip, folders, files from excluded folders, files from Photo Discs, or files from devices that use the Windows Portable Devices (WPD) transfer protocol.
Stacking and Unstacking Files
To Create a Stack:
- Select two or more files in the same folder.
- Do one of the following:
- Click View | Stack | Group into Stack.
- Right-click the selection and choose Stack | Group into Stack.
- Press Ctrl + G.
The first file in the selection becomes the head of the stack.
To Add a File to an Existing Stack:
Do one of the following:
- Drag the file onto a collapsed stack. A plus sign (+) appears on the head of the stack. Drop the file to add it to the end of the stack.
- Expand the stack and drag the file between two files in it. The file is inserted at that position, and the files after it move one position to the right.
The file must be in the same folder as the stack. Dragging a file onto another file doesn't create a new stack. To create a stack, use Group into Stack.
To Unstack Files:
Do one of the following:
- Select the stack and click View | Stack | Unstack.
- Right-click the stack and choose Stack | Unstack.
- Press Ctrl + Shift + G.
To Remove One or More Files from a Stack:
- Expand the stack.
- Do one of the following:
- Select one or more files and click View | Stack | Remove from Stack.
- Select one or more files, right-click the selection, and choose Stack | Remove from Stack.
To Split a Stack in Two:
- Expand the stack.
- Do one of the following:
- Select the file where you want the split and click View | Stack | Split Stack.
- Right-click the file where you want the split and choose Stack | Split Stack.
The stack splits at the selected file. Everything to its left becomes one stack; the selected file and everything to its right become another, with the selected file becoming the head of the new stack.
Splitting at the first or last file in a stack removes that file from the stack instead. Splitting a stack of two leaves both files unstacked.
When a collapsed stack is selected, the head of the stack is the selected file, so Split Stack removes it from the stack, the same as Remove from Stack.
Viewing and Reordering Stacks
Expanded stacks run left to right, so moving a file up in a stack moves it left, and moving it down moves it right.
| Command | Shortcut |
| Stack | Expand Stack | Ctrl + Right Arrow |
| Stack | Collapse Stack | Ctrl + Left Arrow |
| Stack | Expand All Stacks | Ctrl + Alt + Right Arrow |
| Stack | Collapse All Stacks | Ctrl + Alt + Left Arrow |
| Stack | Move Up in Stack | None |
| Stack | Move Down in Stack | None |
| Stack | Move to Top of Stack | None |
To change which file becomes the head of the stack, right-click a file inside it and choose Stack | Move to Top of Stack.
Stacking Files Automatically
Auto-Stack stacks files for you based on when and where files were captured, and how much they resemble one another. Auto-Stack applies to the files you select. If you select only one file, Auto-Stack applies to every file in the folder.
To Auto-Stack the contents of a folder, open the folder and select a single file inside it.
Auto-Stack unstacks every existing stack in the folder before building new ones. This includes stacks you created yourself, and there is no confirmation prompt.
Auto-Stack cannot be used in OneDrive folders.
To Auto-Stack Files:
- Select the files you want to stack. To stack the whole folder, select a single file.
- Do one of the following:
- Right-click the selection and choose Auto-Stack | Auto-Stack.
- Click View | Auto-Stack | Auto-Stack.
- Press Shift + Alt + A.
- In the Auto-Stack dialog box, select one or more criteria and adjust their settings. The preview at the bottom updates as you adjust.
- Click Stack.
How the Criteria Work Together
The three criteria narrow rather than combine. Each one you select subdivides the stacks produced by the one before it, in the order they appear in the dialog box:
- Stack by GPS Location groups files captured near one another.
- Stack by Capture Time splits those groups wherever the gap between files is too large.
- Stack by AI Image Similarity splits what remains wherever the images don't resemble one another closely enough.
Selecting more criteria produces more stacks, each containing fewer files. Files that meet no criteria are left unstacked. Stack by GPS Location and Stack by Capture Time work with both images and videos.
Auto-Stack Options
| Option | Description |
| Preset | Loads a saved combination of settings. Click Save Preset to store the current settings, or click Delete Preset to remove the selected preset. |
| Stack by GPS Location | Stacks files captured near one another. Set Distance Between Locations from 0 to 2,000, and select Meters, Kilometers, Yards, or Miles. A value of 0 stacks only files captured at the same location. |
| Stack by Capture Time | Stacks files captured close together in time. Set Time Between Stacks from 0 to 1,000, and select Seconds, Minutes, Hours, or Days. A value of 0 stacks only files captured at the same moment. |
| Stack by AI Image Similarity | Stacks images that resemble one another. The slider has five positions, from Less similar through Balanced to More similar. |
| Preview | Reports how the current settings would stack your files—for example, 95 files grouped into 35 stacks, 91 left unstacked. Updates as you adjust the settings. |
| Stack | Applies the settings and builds the stacks. |
| Cancel | Closes the dialog box without stacking. |
For more information, see Using AI Image Similarity.
Where Stacks Are Stored
Stacks are stored in the ACDSee Ultimate database. They survive rebuilding the database as long as the files stay in the same folders.