Markers and Snapping
For a finer degree of control during the creative or editing phase of a project, place Markers on the Timeline. To help with the critical task of aligning clips, Media Assets placed in the Timeline snap to Markers and to the starts and ends of other Media Assets by default.
To disable snapping while moving clips in the Timeline, click Disable Timeline Snapping ![]() in the Timeline Toolbar, or press S on your keyboard.
in the Timeline Toolbar, or press S on your keyboard.
There are two types of markers: the Timeline Marker, and the Clip Marker.
Timeline Marker
The Timeline Marker is a Marker added directly to the Timeline.
To Add a Marker to the Timeline:
- With a project open but no Clips selected, move the Playhead to a position in the Timeline where the Marker will be placed.
- Click the Marker button
 on the Timeline Toolbar, or press M.
Clip Marker
The Clip Marker is a Marker added to a Clip residing on the Timeline.
To Add a Marker to a Clip:
- With a project open, move the Playhead over a Clip in the Timeline.
- Click on the Clip to select it.
- Click the Marker button on the Timeline Toolbar, or press M.
The Prev and Next buttons in the Marker Editor dialog can be used to move between markers on the Timeline, or if a Clip is selected, between markers on the selected clip.
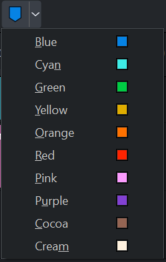
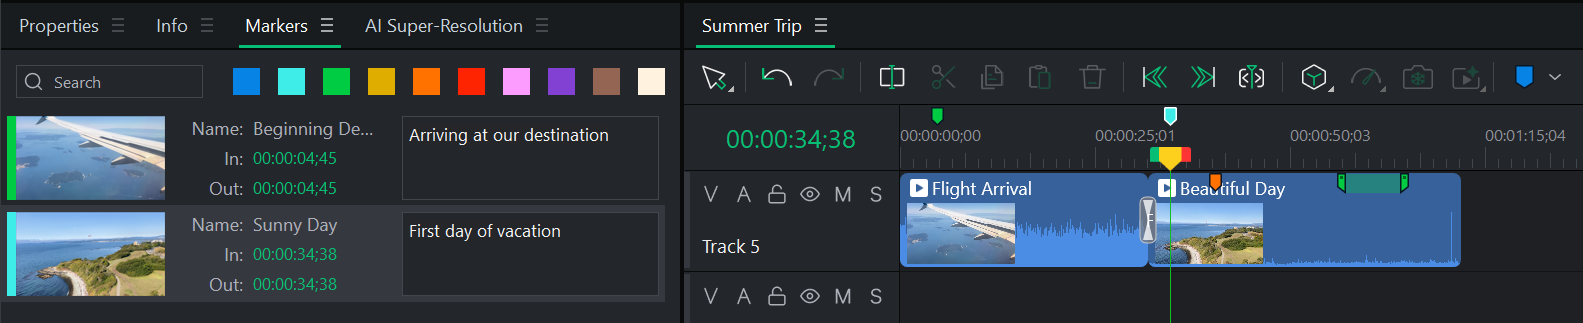
Color Markers
Markers are set as blue by default, however you can assign colors to Markers to aid with organization. Use Color Marker Filters in the Markers Panel to sort items by label.
Click on the down-arrow to the right of the Marker icon to select a specific color. When adding Markers, the selected color will be applied. Marker colors can be changed at any time by editing the Marker.
Editing Markers
To Edit a Marker:
- Do one of the following:
- Select the Marker, then select Edit | Markers | Edit Marker from the main menu.
- Click on the Marker and press M.
- Double click on the Marker.
- Double click on the Marker in the Markers Panel.
The value in the Time value matches the position of the Playhead.
- Add an optional Name and/or Comments about the selected Marker.
- Select a color for the Marker.
- Click the OK button.
To Delete a Marker:
Click on a Marker on the Timeline, on any Clip, or in the Markers Panel to select it and then perform one of the following:
- Press the Delete Key.
- Right-click on the Marker and select Remove Marker.
To Delete All Markers on the Timeline or Selected Clip:
Right-click on any Marker on the Timeline or a selected Clip and select Remove All Markers, or press Ctrl + Shift + Alt + M.
Markers Panel
Markers that have been applied to the Timeline or Clips can be viewed and modified in the Markers Panel. The Markers Panel displays Clip Markers when a Clip is selected. If no Clip is selected, it will show Timeline Markers.
You can search for Markers in the Markers Panel by selecting one of the Color Marker Filters, or using the Search field. You can search for text contained in the Name or Comment fields.
To View Markers in the Markers Panel:
Do one of the following:
- Click on an empty space in the Timeline to view Markers assigned to the Timeline.
- Click on a Clip in the Timeline to view Markers assigned to the selected Clip.
Click on a Marker in the Markers Panel to select it in the Timeline and move the Playhead to the selected Marker.
Duration Markers:
In addition to single-point markers, you can create Duration Markers that span a range of time.
To Create a Duration Marker:
- Add a Marker at the starting point of the time range you want to mark on the Timeline.
- Open the Marker Panel.
- Set the In and Out time values to define the desired duration.
The Marker will visually extend across the full length of the specified range.

Clip Marker Context Menu Items
|
Menu Item |
Description |
|
Edit Marker |
Opens the Marker Editor dialog |
|
Remove Selected Marker |
Deletes the current Marker from the project's Timeline, regardless of whether the marker is a Timeline Marker or a Clip Marker. Alternatively, press Shift + Alt + M. |
|
Remove All Markers |
Deletes all Timeline Markers and Clip Markers from the project's Timeline. Alternatively, press Ctrl + Shift + Alt + M. |
|
Go To Previous Marker |
Selects the Marker before the current Marker. |
|
Go To Next Marker |
Selects the Marker after the current Marker. |
Timeline Marker Context Menu Items
|
Menu Item |
Description |
|
Go to In |
Moves the Playhead to the In mark. |
|
Go to Out |
Moves the Playhead to the Out mark. |
|
Add Marker |
Adds a Marker at the current location of the Playhead. Use the dropdown list to select a color for the Marker, or press M to use the currently selected color. |
|
Go To Previous Marker |
Selects the Marker before the current Marker. |
|
Go To Next Marker |
Selects the Marker after the current Marker. |
|
Remove Selected Marker |
Deletes the current Marker from the project's Timeline, regardless of whether the marker is a Timeline Marker or a Clip Marker. |
|
Remove Timeline Markers |
Available only in Timeline Marker context menus, Remove Timeline Markers deletes all Timeline Markers from the project's Timeline. |
|
Remove All Markers |
Deletes all Timeline Markers and Clip Markers from the project's Timeline, or press Ctrl + Shift + Alt + M. |
|
Edit Marker |
Opens the Marker Editor dialog |
|
Time Ruler Numbers |
Displays time increments on the top of the Timeline, below the buttons. |