Develop Mode Masking
You can make local adjustments using one of the single click AI options to mask Subject, Background or Sky. You can also make finer manual adjustments with brush, linear and radial gradient masks.
You can save your settings as a preset for future use.
To Mask Your Image in the Develop Mode:
- In Develop mode, select the Tune or Details tab.
- In the Masking group, use one of the options listed below.
You can right-click a slider to reset to the default value.
Masking Options
|
AI Subject |
Use AI to detect and automatically select the subject in the image and apply a mask over it. |
|
AI Background |
Use AI to detect and automatically select the background in the image and apply a mask over it. |
|
AI Sky |
Use AI to detect and automatically select the sky in the image and apply a mask over it. |
|
AI Object |
Use AI Object to detect and automatically apply a mask over the objects you select. |
|
Brush |
Use the Develop Brush to paint a mask onto the image. |
|
Linear Gradient |
Create a mask using the Linear Gradient tool. |
|
Radial Gradient |
Create a mask using the Radial Gradient tool. |
|
Luminance Range |
Create a mask using the Luminance Range tool. |
|
Color Range |
Create a mask using the Color Range tool. |
Use the Settings button  to reset sliders to Last Saved or Last Used settings. You can also save your settings as a preset, copy, or paste them.
Right-clicking on either a linear gradient, or radial gradient mask will allow you to convert them into a brush mask.

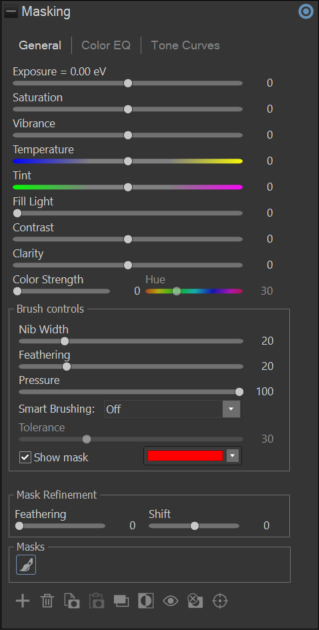
Adjusting Brush Controls
The Develop Brush controls can be adjusted once you've begun applying a mask. The options will appear at the bottom of the Masking group and include:
|
Nib Width |
Adjusts the size of the brush. You can use the mouse wheel to adjust nib width or adjust the Nib Width slider. |
|
Pressure |
Adjust the slider to control the strength of the brush. |
|
Smart Brushing |
use the Smart Brush to target your brushing to specific colors, brightness values, or a combination of color and brightness. For more information see Using the Develop Brush. |
|
Tolerance |
Increase or decrease the range of pixels affected by the Smart Brush. For more information see Using the Develop Brush. |
|
Show Mask |
Toggle to display the mask. Use the dropdown to set the color that the mask will appear as. |
|
Feathering |
Adjust the slider to control the softness of the transition between the brush strokes and the image. Use Ctrl + mouse wheel to adjust the amount of feathering or adjust the Feathering slider. |
|
Shift |
Adjust the slider to control the thickness of the brush strokes, allowing you to finely expand or contract the mask and ensure it fits correctly. |
Managing Masks in Develop Mode
Additional masks can be added once you've begun masking by pressing + at the very bottom of the Masking group. Each mask will appear within the Masks section just above the button, and can be switched between quickly by clicking on the mask within the section.
Copying and Pasting Masks
Masks can be copied by pressing Copy Selected Mask, found at the bottom of the Masking group. A copied mask can then be pasted by using the Paste Selected Mask button found directly to the right of the Copy Selected Mask button.
Copied masks can be taken from one image to the next. If a mask has been copied, a 7th masking choice will display when loading a different image in Develop Mode called Paste Copied Mask. Pressing this button will paste the copied mask as your first mask on this new image. Leaving Develop Mode, or restarting the application will clear the copied mask.
Masks that have been copied and pasted will be pasted as brush masks, regardless of the original mask type.
Duplicating Masks
Masks can be duplicated by pressing the Duplicate Selected Mask button to the right of the Copy and Paste buttons.
Masks that have been copied and pasted, or duplicated, will only copy the mask, not the settings.
Inverting Masks
Masks can be inverted by pressing the Invert Selected Mask button to the right of the Duplicate Selected Mask button.
Masking Toolbar
At the bottom of the Masking group is the Masking Toolbar. This includes options for:
|
Add a new mask |
Brings up a menu to select a new mask type to apply. |
|
Delete the currently selected mask |
Deletes the currently selected mask. |
|
Copy the currently selected mask |
Copies the currently selected mask. |
|
Paste mask |
Pastes the currently copied mask. |
|
Duplicate the currently selected mask |
Creates a duplicate mask of the currently selected mask. |
|
Invert the currently selected mask |
Inverts the currently selected mask. |
|
Enable the currently selected mask |
Enable or disable the ability to see the currently selected mask. |
|
Clear the currently selected mask |
Deselects the currently selected mask. |
|
Pixel Targeting Mask |
Opens/closes the Pixel Targeting popup dialog. |