Organizing, Adjusting, and Displaying Media
Media Assets can be arranged on Timeline tracks to create and edit a video. Using multiple tracks allows for unlimited layering of content. Drag and drop audio, video, and images from the Media panel to any track on the Timeline, at any point on the Timeline. It is also possible to drag Text, Transitions, Behaviors, Filters, Overlays, Elements, and Adjustment Layers to specific media locations on the Timeline. Captions will be added at the Playhead. After media has been added to the Timeline, move the media to a desired location by selecting and dragging.
Timeline Tracks
Use the tracks on the Timeline to create a layered hierarchy of content. For instance, if a Media Asset is placed on Track 1, but then another Media Asset is added on Track 2 at the same point in time, the Media Asset on Track 2 will visibly cover the Media Asset on Track 1 when the project is played back. However, the way in which media appear can be altered by adjusting its opacity and blend mode. Opacity determines the transparency of the media. By altering the Opacity of the Media Asset on Track 2, the Media Asset on Track 1 can show through. Blend modes determine how layers blend together.
- Select a Media Asset on the Timeline.
- The Media Asset will display its properties within the Properties tab, found by default in the bottom-left of the program.
Properties Panel Options
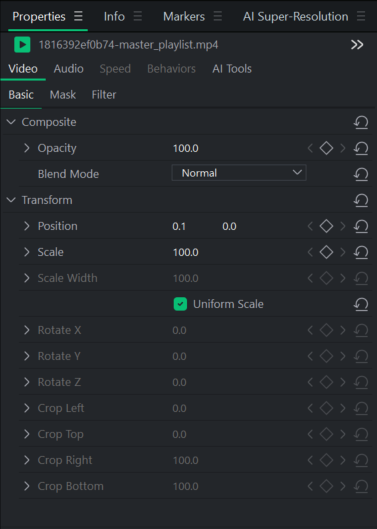
The Properties Panel is where you will find properties and settings for any Media Asset you're using in LUXEA Free. There are 5 main tabs: Video, Audio, Speed, Behavior, and AI Tool. Under Video, the Basic Tab will display settings and options that represent the file selected.
|
Video |
|
|
Composite |
Composite contains Opacity, which allows you to set the opacity levels with Keyframes, and Blend Mode, allowing you to configure how colors blend with each other. |
|
Opacity |
Use the Opacity setting to increase or decrease the Opacity as desired. |
|
Blend Mode |
Set the color blend mode. |
|
Transform |
Transform contains a standard suite of properties to adjust such as position, scale, scale width, rotation on X, Y, or Z axes, and cropping on any side. |
|
Position |
Set the position of the element with X and Y parameters. |
|
Scale / Scale Height |
Set the scale of the element. If Uniform Scale is unchecked, this setting will only scale the height. |
|
Scale Width |
Set the scale width of the element. This setting is only available if Uniform Scale has been unchecked. |
|
Rotate X, Y, Z |
Set the rotation value for X, Y, and Z axes. |
|
Crop Left, Top, Right, Bottom |
Set crop values for the left, right, top, and/or bottom of the element. |
|
Audio |
Audio will appear if the selected Media Asset contains audio. |
|
Volume |
Adjust the audio volume level. |
|
Channel Volume |
Adjust the channel volume for the left or right audio channels. |
|
Panner |
Adjust the audio balance by panning to the left or right. |
|
Pitch |
Increase or decrease the semi tones of a clip to adjust its pitch. |
|
Equalizer Only available in LUXEA Pro |
Click on the dropdown to choose an equalizer preset, or click the arrow to the left of Preset to reveal the equalizer bars and create your own custom setup. |
|
Speed |
|
|
Uniform Speed |
Uniform speed will remain the same throughout the clip's playback. |
|
Speed |
Use the speed meter to increase or decrease the speed of the clip. The overall duration of the Clip will increase/decrease accordingly. |
|
Duration |
Use the duration to set the length of the clip. Speed and Duration are directly related. |
|
Reverse Only available in LUXEA Pro |
Select Reverse to play the clip backwards. |
|
Ripple Only available in LUXEA Pro |
Select Ripple to allow audio clips to retain gaps automatically when a clip's speed/duration has changed. |
|
Pitch Only available in LUXEA Pro |
Select Pitch to ensure the pitch remains the same, regardless of whether the clip has been sped up or down. |
|
Speed Ramping |
Speed ramping allows for both gradual and rapid changes in speed with smooth transitions from speed to speed. Every option can be adjusted in the Properties panel. |
|
This feature is not available in LUXEA Free Video Editor. Please Upgrade to LUXEA Pro Video Editor for access to this feature and much more. |
|
|
None |
Applies no changes to speed. |
|
Custom |
Allows you to set your own custom speed changes. |
|
Montage |
Montage starts off ramping up the speed quickly, then just as quickly slows down. |
|
Hero Moment |
Hero Moment gently speeds up the clip, then drops the speed for a slow-mo moment of glory, before speeding back up and then returning to standard speed. |
|
Bullet Time |
Bullet Time begins at a high speed, and dips for slow-mo, before returning to high speed. |
|
Jumper |
Jumper begins at a low speed, and spikes quickly, increasing the speed dramatically before returning to the original, slow speed. |
|
Flash In |
Flash In starts off at a high speed, and slows down to standard speed. |
|
Flash out |
Flash out starts off at standard speed, and speeds up as the clip ends. |
|
Behaviors |
|
|
In/Out |
Adjust settings for behaviors placed on the entrance and exits of your media |
|
Style |
Use the Style drop-down menu to change the behavior's style |
|
Movement |
Use the Movement drop-down menu to customize the behavior's flow |
|
Speed |
Use the Speed slider to increase or decrease the behavior's speed |
|
During |
Adjust settings for behaviors set to occur during your media |
|
Style |
Use the Style drop-down menu to change the behavior's style |
|
Movement |
Use the Movement drop-down menu to customize the behavior's flow |
|
Loop Time |
Set the amount of time for which the behavior will loop |
|
Loops |
Drag the slider to set the behavior's number of loops |
|
Loop Forever |
Toggle to enable continuous looping |
Selecting and Re-Arranging Timeline Tracks:
Timeline tracks can be selected by clicking on the track head on the left side of the Timeline.
To Re-Arrange a Timeline Track:
Perform one of the following:
- Click the track head and drag it up or down.
- Right click on the track head and select Move Up or Move Down.
Resizing Timeline Tracks:
You can resize Timeline tracks by hovering over the top edge of a track until the cursor changes to ![]() then clicking and dragging up or down.
then clicking and dragging up or down.
- Expanding a track increases the size of its waveform and preview image.
- Shrinking a track reduces the size of its waveform and preview image, and will eventually hide them when the track is small enough.
You can also right-click on a track and select from Maximize, Minimize, or Restore Track.
- Maximize Track: Maximizing the track will expand it to the maximum size, ensuring the preview and waveform are clearly visible.
- Minimize Track: Minimizing the track will shrink it to the minimum size, ensuring the preview and waveform are hidden.
- Restore Track: Right click on a track and select Restore Track to return its dimensions to their default values.
Flipping Media Assets on the Timeline:
This feature is not available in LUXEA Free Video Editor. Please Upgrade to LUXEA Pro Video Editor for access to this feature and much more.
You can flip Media Assets horizontally, or vertically on the Timeline by right-clicking on it and selecting Flip Horizontal (Ctrl + Shift + H), or Flip Vertical (Ctrl + Shift + V).
Enabling and Disabling Selected Clip in Timeline
Temporarily disable selected clips in the Timeline without deleting or moving them. Disabled Clips are hidden from playback and export, but remain in place on their track for later use. Enable the Clip again to continue using it.
How To Toggle Selected Clips in the Timeline On/Off:
- Select one or more Clips in the Timeline.
- Right-click the selected Clip and choose Enable/Disable Clip, or press the D key on your keyboard.
Copying and Pasting Properties
The properties applied to any Media Asset can be applied to any other media asset on your Timeline.
To Copy and Paste Properties:
- Right-click a media asset on the Timeline with any properties applied to it.
- Select Copy from the context menu, or press Ctrl+ C.
- Select another clip on the Timeline.
- Right-click and select Paste Properties, or press Ctrl + Alt + V.
Tracks, along with any Media Assets on them can be locked to prevent editing or other changes by clicking the Lock button  .
.
To unlock the track, press the Unlock button  .
.
Tracks can be hidden or revealed, and by extension, the media on those tracks, by clicking the Disable button on the track  .
.
Hiding tracks can be useful for isolating and editing specific parts of a video.
Video productions will not include media on tracks set to "Disabled".
Renaming Clips in the Timeline
This feature is not available in LUXEA Free Video Editor. Please Upgrade to LUXEA Pro Video Editor for access to this feature and much more.
Renaming Clips directly in the Timeline helps you differentiate between multiple instances of the same source file, making complex edits easier to manage and organize. This is useful for identifying Clip roles or purposes (e.g., "Intro Audio," "B-Roll 1"), managing repeated or reused assets, improving clarity during multi-track editing, and more.
How to Rename Clips in the Timeline:
- Right-click on a Clip in the Timeline.
- Select Rename from the context menu.
- Enter a new name in the dialog box and click OK.
Muting and Soloing Tracks
This feature is not available in LUXEA Free Video Editor. Please Upgrade to LUXEA Pro Video Editor for access to this feature and much more.
Tracks can be set to Mute, or Solo. A track that has been set to Mute will not play audio during playback and on exported files. A track that has been set to Solo will Mute all other tracks except for this one, so only it's audio is played during playback.
Multiple tracks can be Muted and or Soloed at the same time. Soloing multiple tracks will play audio from each track that has been Soloed, while the rest are Muted.
If a track is Muted and Soloed at the same time, both functions will be taken into account. For example, all other tracks will be Muted, but so will the Soloed track as it also has Mute set to on.
Closing Gaps on the Timeline
Empty spaces between media can be removed on the Timeline by using Close Gaps on Track.
To Remove an Empty Space on a Track:
- Right-click an empty area on a track in the Timeline.
- Select Close Gaps on Track from the context menu.
To Remove an Empty Space Between Multiple Media Assets:
- Select multiple media assets in a track on the Timeline.
- Right-click one of the selected media assets.
- Select Close Gaps from the context menu.
Trimming Clips
Clips can be trimmed to the current position of the Playhead on the Timeline. You can trim from the beginning of a Clip, or the end of a Clip.
To Trim From the Beginning of a Clip:
Place the Playhead on the Timeline where you would like the beginning of the Clip to trim to and perform one of the following:
- Click Edit from the top menu, and select Trim Start
- Press Shift + [.
- Right-click the Clip and select Trim Start.
- Left-click the left side of the Clip and drag to the right to Trim from the start.
To Trim From the End of a Clip:
Place the Playhead on the Timeline where you would like the end of the Clip to trim to and perform one of the following:
- Click Edit from the top menu and select Trim End
- Press Shift + ].
- Right-click the Clip and select Trim End.
- Left-click the right side of the Clip and drag to the left to Trim from the end.
Quick Replace
This feature is not available in LUXEA Free Video Editor. Please Upgrade to LUXEA Pro Video Editor for access to this feature and much more.
Quick Replace lets you swiftly trade Clips on the Timeline with a different Media Asset from your Media Panel, without manually re-timing or repositioning them.
How to Use Quick Replace:
- In the Timeline, select one or more Clips you want to replace.
- In the Media Panel, right-click the asset you want to use as the replacement, and select Replace in Track.
Default Video and Audio Tracks
When viewing media in the Media Panel, you can right click on any piece of media and select Insert, Overwrite, and Append. Inserting will place the Media Asset on the Timeline at the Playhead location on the default track for video or audio, depending on what type of media file you selected. Overwriting will place the Media Asset on the Timeline at the Playhead location, overwriting anything that may have been there previously up to the end of the added Media Asset. Appending will place the Media Asset on the Timeline in the designated audio or video track after the final item on the Timeline.
Relink Offline Media
If files are moved to another folder on your computer after being added into a Project, they may display with a red thumbnail indicating that the file needs to be re-linked to the Project.

LUXEA Pro Video Editor will check for unlinked Media Assets when a project is loaded and provide a popup window for Relinking Media. Click the Relink button on the popup window to bring up the Relink Media menu and navigate to where your Media Asset is located. Only one Media Asset can be selected at a time, but will also relink all missing Media Assets found in the same folder.
Media that becomes disconnected from its source location can be also be Relinked manually by Right-clicking the Media Asset, and selecting Relink Media. Selecting multiple media files and then Right-clicking and selecting Relink Media will relink multiple files at once.
Playback Quality
The video playback quality can be adjusted to help speed up the editing process. This is useful when working with high quality videos or if the host computer is processing the video slowly.
To Change Playback Quality:
To change playback quality, do one of the following:
- Click the drop down menu beside the seek bar
 and select a quality.
 - Select View | Playback Quality from the menu and make a selection from the list.
Changing the playback quality will not affect the quality of the final output.
Full Screen Playback
Video playback can be viewed in full screen to experience the video in more detail.
To View Playback in Full Screen:
To view the video playback in full screen, do one of the following:
- Select View | Display Area from the menu and select Full Screen/Restore.
- Press F.
- Click the Full Screen button.

Display Area
The Display Area previews how a video will look once rendered. Content can be moved around and resized within the Display Area. Resize by dragging the handles on the edges of the media. To resize while maintaining the aspect ratio, use one of the corner handles. To create an abnormal aspect ratio, hold down Shift while dragging the corner handles.
Media Assets can be shifted up, down, left and right on the Display Area by clicking the clip either on the Display Area, or in the Timeline, and pressing Ctrl + Up, Ctrl + Down, Ctrl + Left, or Ctrl + Right.
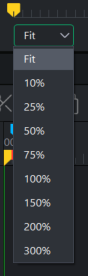
Zoom the Display Area to accommodate monitor size by using the percentages in the drop-down menu at the top of the Display Area. Select Fit to allow LUXEA Free to adapt automatically.
To Change the Magnification of the Display Area:
To change the magnification of the Display Area, do one of the following:
- Select View | Display Area from the menu and Select a Magnification level.
- Select a Magnification level from the drop-down menu on the bottom-left of the panel.
- Increase Magnification with +, or decrease Magnification with -.
To Scale to Fit Frame Size:
This feature is not available in LUXEA Free Video Editor. Please Upgrade to LUXEA Pro Video Editor for access to this feature and much more.
Right-click any Video, Image, or Element in the Timeline and choose Scale to Fit Frame Size to automatically scale the asset to fit within the project frame boundaries.
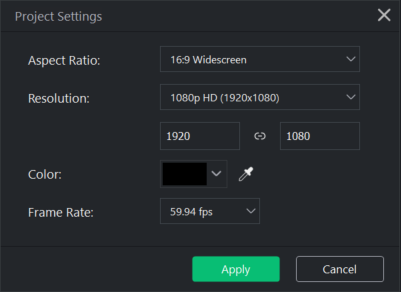
To Configure the Display Area Settings:
To configure the Display Area settings for a project and resulting video production, do one of the following:
- Click the Project Settings button under the preview in the Display Area
 .
. - Click File and select Project Settings.
Configure the settings as described below and click Apply the apply button.
Change the size settings for a rendered video in the Settings dialog in the Export tool.
Project Settings
|
Aspect Ratio |
Sets the Aspect Ratio of the project. Aspect Ratio is the proportional relationship between the height and width of a Media Asset. |
|
Resolution |
Sets the Resolution of the project. The link icon |
|
Color |
Customize the Display Area background Color by selecting a color from the drop-down menu. |
|
Choose a Frame Rate for a video from 23.97 frames per second (fps) to 60 fps. |
When exporting in LUXEA Free Video Editor, Frame Rate is limited to 30 fps.

|
Edit tool: use the Edit tool to move and resize media within the Display Area. |
Ctrl + Shift + E |

|
Pan tool: use the Pan tool to move the Display Area without resizing it. |
Ctrl + Shift + P |

|
Crop tool: use the Crop tool to remove unwanted parts of the media. Drag the handles of the crop window to your desired size. To maintain the media's aspect ratio, resize the crop window by dragging the corners. Move the crop window around. To restore cropped material, re-enter the Crop tool and resize the crop window as desired. |
Ctrl + Shift + C |
Audio Meter:
When viewing media within your project, an audio meter will display the current left and right channel levels in the bottom right of the program. This can be toggled on or off by 
